There are several ways to choose the filesystems of either the table or the JSON output:
- Choose between the “normal” ones or all of them
- Select the filesystem containing a specific path
- Use the rich query syntax of the
--filterargument
Normality
The default selection of filesystems showcases your storage: it leaves out virtual filesystems, bound mounts, and other filesystems with no underlying disk, except remote ones.

More precisely, a filesystem is listed by default when all these conditions hold:
- its usage statistics could be read, or it’s unreachable (eg a remote one whose server is down)
- it has an underlying disk, or it’s remote, or it’s of type
zfs - its disk isn’t a disk image
- it isn’t bound to another filesystem
- it isn’t of type
squashfs - (on mac) it isn’t the read-only system volume mounted on
/, and isn’t mounted in/System(except/System/Volumes/Data) or in/Library/Developer
Usage statistics may also be missing because they were skipped or took too long.
To see all filesystems of your system, do dysk --all:

This list can be quite big with virtual file systems, docker use, etc.
Current filesystem
If you’re only interested in the device on which some file is, give the path as argument.
For example, for the current device, use dysk .:

This filesystem is shown even when it isn’t a “normal” one. Bound mounts of the same device are only shown with -a.
Filter argument
The --filter argument, shortened in -f, lets you specify a constraint, or combine several ones.
A constraint can be related to any column.
You can for example fetch the filesystems with a given type with dysk -f 'type=xfs'.
Or remote volumes with dysk -f 'remote=true'.
The operators you can apply to a column are the following ones:
| operator | meaning |
|---|---|
| < | lower |
| <= | lower or equal |
| > | greater |
| >= | greater or equal |
| <> | different |
| = | on text columns, contains, ignoring case - for example fs=sda matches /dev/sda1; on other columns, equal |
| == | really equal |
The value is read according to the column:
- sizes (
size,used,free) and counts (inodes_free, etc.) take a number, optionally with a unit:100G,4kB,1.5T. Addifor 1024-based units, eg54GiB - shares (
use,use_percent,free_percent,inodes,inodes_use_percent, etc.) take a percentage like65%, or a fraction like0.65 - booleans (
remote) taketrueorfalse,yesorno,1or0
You can combine several column conditions with boolean operators | (or), & (and) and ! (not) and if needed you can use parenthesis.
For example you may want to select the volumes with not enough space with
dysk -f 'free<100G | use>65%'
Examples:
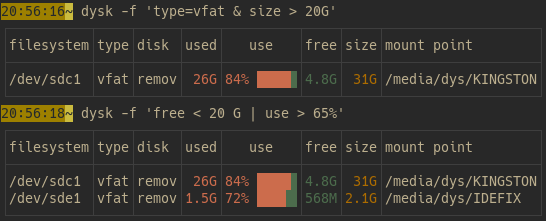
Note:
Only normal filesystems are shown unless you use -a. This applies even when you use the --filter argument.