Table of Contents
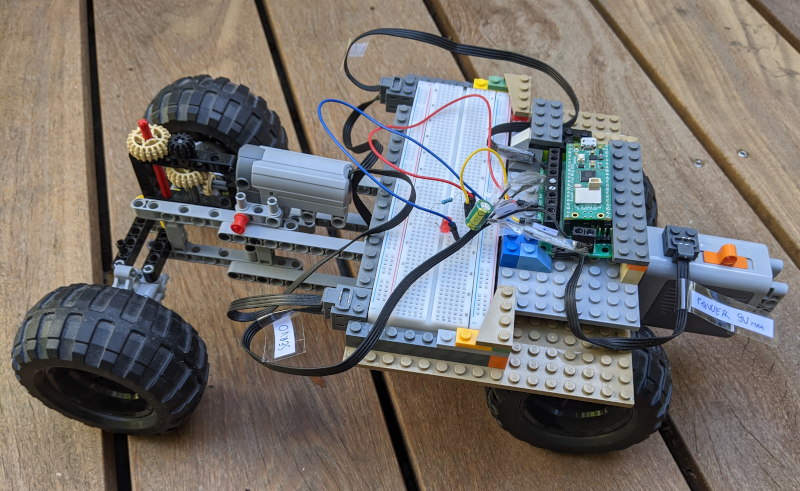
If you already have the parts of a common Lego car, it's very cheap and easy enough to make it remotely controlled from your computer with a Rust program running on a Raspberry Pico.
It's also a good opportunity to dive into safe embedded programming with a reasonably advanced project, assuming you're already familiar with the Rust language.
Features
Basically, our car
- can go forward and backward
- can turn
- is controlled from your PC by sending orders over TCP on WIFI
- is totally wireless, using a Lego power pack for power
You'll find many tutorials online for Pico W remote controlled cars but I think this one is original in several ways:
- The program is in Rust and
no_std. Most hobbyists use a high-level framework, most often in Python, isolating them from the constraints of low-level no-allocator programming - It's in Rust async so we get memory safety and easy concurrent tasks
- It uses a standard Lego servomotor while Pico based vehicles usually use more standard servomotors, often at 50 Hz, which don't require dealing with the proprietary logic of the Lego servo
- It uses the Lego power pack to power all parts, including the Pico. Most builds include a dedicated power pack
- It doesn't use a separate probe (people often use a second Pico), all logs are sent by USB to the PC
And yet, despite these constraints, it works very well, it's easy to drive and reacts as you'd expect.
Hardware parts
Raspberry Pico WH
The Raspberry Pico is a small board hosting a RP2040 microcontroller chip.
The W stands for WIFI.
The H stands for "headers": it means there are pin headers solderied to the board making it easier to plug it for us.
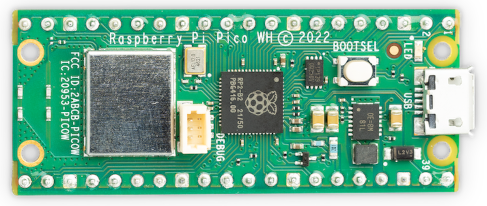
Note:
- the USB-C connector on the right
- the big grey component on the left: it's the WIFI chip
- the BOOTSEL push-button used to reset the Pico for installation of a program
If you look at the other side, you'll see labels for the headers (the metallic spikes) but not the alternate labels and you can't look at this side of the board when it's in the breadboard so the official pin diagram is handy:
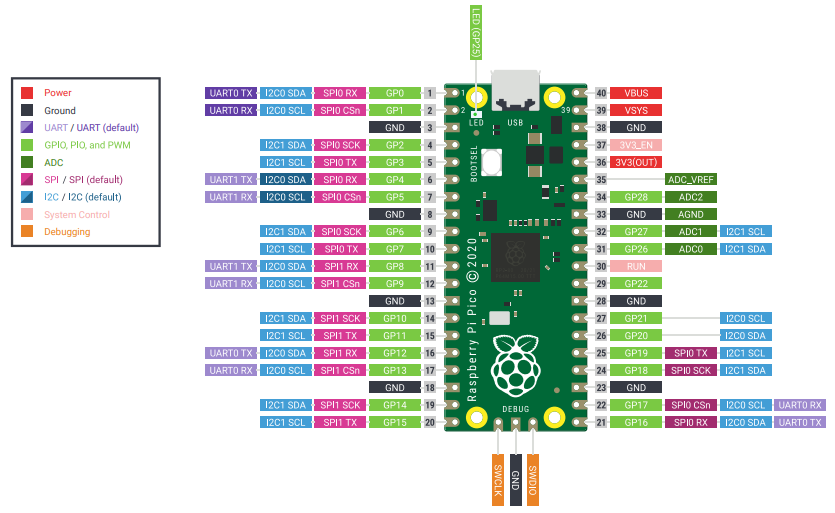
Hint: notice how all GND (ground) have a square header. This will help you find the pin you need.
I also like to use this interactive diagram.
The Pico WH costs about 8€.
Kitronik 5331
This "motor driver" makes it easier to control the servomotor and the motor, and, more importantly, to power the Pico which operates at 3V with the 9V Lego Power pack.
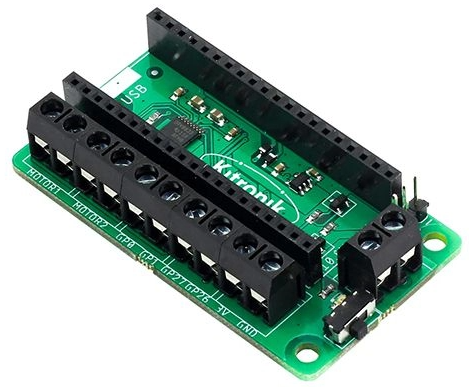
The Kitronik 5331 costs about 14€.
Lego parts
Those parts are basically the ones you'll find in an old Power Functions Lego car.
If you have one of those already mounted, you can use it as basis, removing the IR receptor to put the Pico based electronics in its place.
What's needed if you don't have the car mounted:
- a battery pack (it's 9V)
- a servomotor (be careful that "Lego compatible" servomotors are often just barely working)
- a motor
You also need 2 flat cables (at least 20cm) that you'll cut and rewire. I bought compatible ones online.
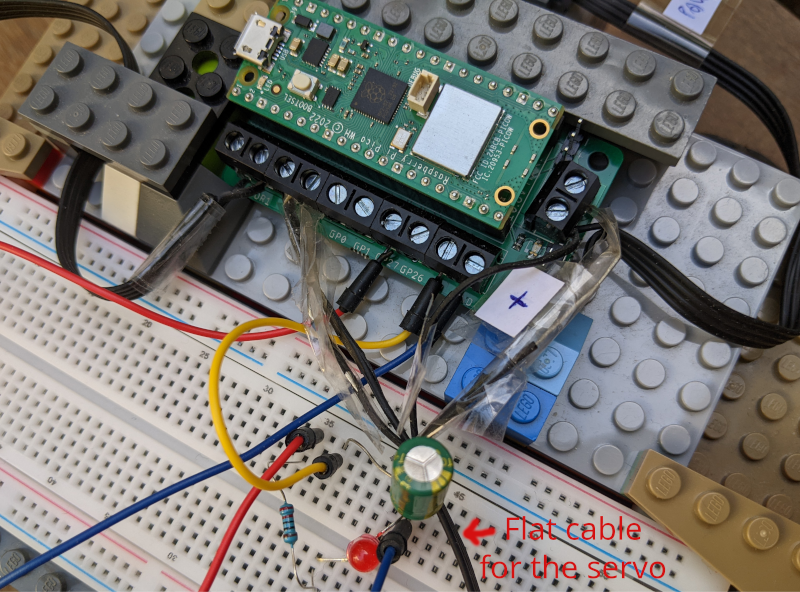
A Lego Power Functions flat cable contains 4 wires. The two external ones are for power and it's very important to know which one is positive or you'll toast your Pico so here's a picture:
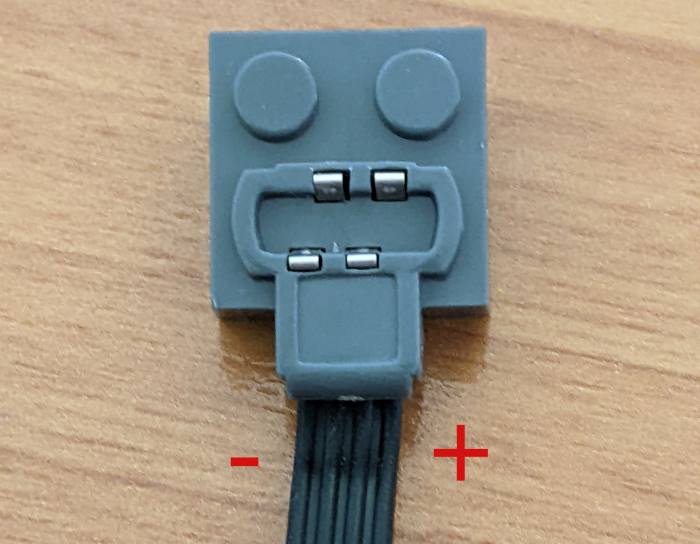
(if you have a multimeter, you can also check the voltage with the battery pack switched on)
Connectors & Electronics
USB-C to USB-A data+power cable
This cable is used to install the program on the Pico, to power it and get back logs in first stages of our project.
I just went with the official USB cable as debugging USB wire problems aren't fun. It costs about 2.5€.
Capacitor
A motor generates electrical noise and current spikes on transitions.
A capacitor in parallel of the Kitronik's power circuit helps stabilize power.
I went with 100 μF but a smaller one is probably fine too.
Note: it seems to be also standard practice to add a capacitor directly across the motor but I don't seem to have had problems so I didn't bother.
Breadboard, resistor, diode, push-button, small wires
The breadboard is that thing in which you hook your components to establish electrical contact without soldering them. It's not absolutely needed here, especially as we mostly use it for the diode, but it makes experiments easier.
A 220 Ohm resistor is OK.
To get those items and many other ones, You can buy the "Experiment Kit" from Kubii for about 22€. As you're bound to do your own experiments to go further, it's a good value if you don't have electronics parts around.
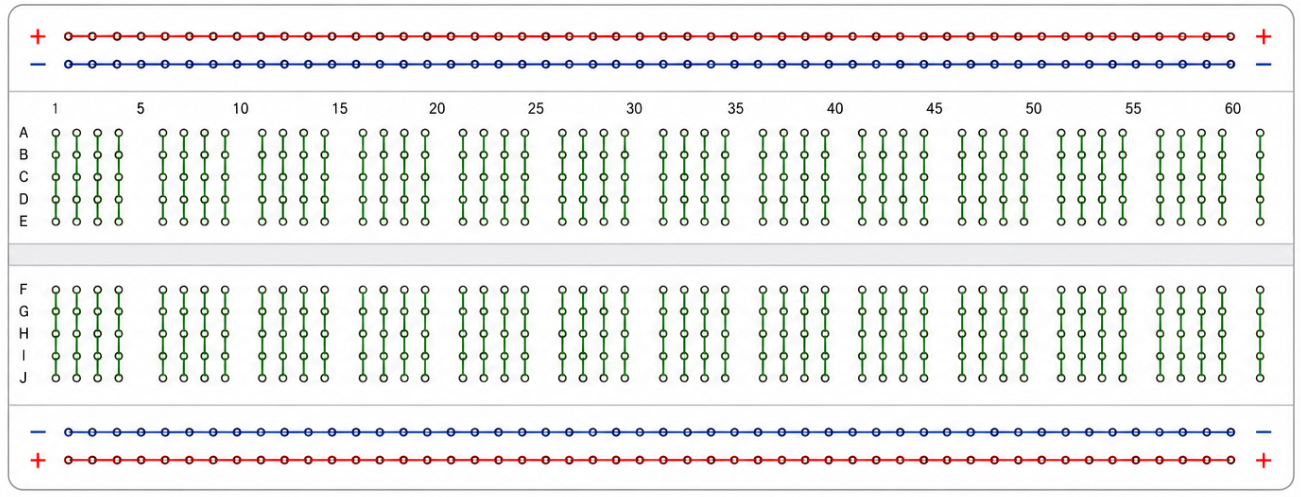
In order to connect items, you need to have seen at least once how the breadboard holes connect them. Here's a schema with the colored lines representing the conductor lines in the plastic:
Software parts
Build chain
First you'll need the usual rust build chain. Fetch it from https://rustup.rs.
To compile for the RP2040 chip, you'll need the thumbv6m-none-eabi target.
Install it with rustup target add thumbv6m-none-eabi.
Then you'll need flip-link, which helps detect stack overflows by placing the stack and heap in a safer layout : cargo install flip-link.
The elf2uf2-rs program reads the standard ELF file produced by cargo build, converts it to the right memory layout for the Pico, searches for a mounted Pico among USB mass storage devices, then writes the file.
Install it with cargo install elf2uf2-rs.
Embassy
Embassy is a great Rust async framework for embedded devices, coming with abstraction layers for many chips and especially the RP (ours).
Embassy provides drivers, timers, executors, networking support and many other building blocks typically supplied by an operating system on a desktop machine.
Many things become much easier with Embassy, most importantly WIFI and USB connections.
As the crates at crates.io were behind at time of writing and may still be, I suggest you don't try to use them but just clone the whole repository from https://github.com/embassy-rs/embassy. The Pico W WiFi chip requires proprietary firmware files which are distributed alongside the Embassy repository and that need to be embedded in the application. Cloning the repository also make them available.
For this article, I'll assume embassy is at ../../embassy from your project, and that you copied embassy's cyw43-firmware folders. For example:
 📁 user-home
 └──📁 dev
    ├──📁 embassy
    └──📁 pico
       ├──📁 cyw43-firmware
       └──📁 pico-mobile
tio
Unlike desktop programs, embedded devices usually don't have a terminal attached. A serial-over-USB connection is therefore one of the simplest ways to inspect logs.
You'll use tio to display the traces sent over USB.
Install it. On my Mac, I just did brew install tio.
netcat
You'll use it to send commands until we build an interface for smoother car driving. Install if it's not already here.
Step by Step
If we were to build the whole car and directly test it, we wouldn't know what to fix if it doesn't work, and there would be too many new concepts to grasp at once.
That's why I suggest to follow this path, made of steps which can each be understood and fixed if necessary.
But before even the first step, let's prepare the files which won't change afterwards.
Project Setup
Go to the directory which will be the parent of the pico-mobile project (user-home/dev/pico in the example above) and do cargo new --bin pico-mobile.
Then move to the newly created pico-mobile directory.
We want cargo run to not only compile but also convert the program and send it to the Pico.
For that, create a .cargo directory in pico-mobile then paste this in pico-mobile/.cargo/config.toml:
[target.thumbv6m-none-eabi]
runner = "elf2uf2-rs -d"
rustflags = [
  "-C", "linker=flip-link",
  "-C", "link-arg=-Tlink.x",
]

[build]
target = "thumbv6m-none-eabi"
The linker also needs a memory.x file, which goes at the root next to the Cargo.toml file:
MEMORY
{
  BOOT2 : ORIGIN = 0x10000000, LENGTH = 0x100
  FLASH : ORIGIN = 0x10000100, LENGTH = 2048K - 0x100
  RAM   : ORIGIN = 0x20000000, LENGTH = 264K
}
SECTIONS
{
    .boot2 : ALIGN(4)
    {
        KEEP(*(.boot2))
    } > BOOT2
}
Update the Config.toml file to hold all the dependencies we'll use in this project:
[package]
name = "pico-lego-motor"
version = "0.1.0"
edition = "2021"

[dependencies]
cortex-m-rt      = "0.7"
cyw43     = { version = "0.7", path = "../../embassy/cyw43", features = ["log", "firmware-logs"] }
cyw43-pio = { version = "0.10", path = "../../embassy/cyw43-pio" }
embassy-executor = { version = "0.10", features = ["platform-cortex-m", "executor-thread"] }
embassy-futures  = "0.1"
embassy-net = { version = "0.9", features = ["log", "tcp", "dhcpv4", "medium-ethernet", "proto-ipv4"] }
embassy-rp       = { version = "0.10", features = ["time-driver", "critical-section-impl", "rp2040"] }
embassy-time     = { version = "0.5" }
embassy-usb      = { version = "0.6", default-features = false }
embassy-usb-logger = "0.6"
embedded-io-async = "0.7"
log                = { version ="0.4", default-features = false }
panic-halt = "1.0"
portable-atomic = { version = "1", features = ["critical-section"] }
rp2040-hal = "0.12"
static_cell      = "2"
fixed = "1.28"

[patch.crates-io]
embassy-executor     = { path = "../../embassy/embassy-executor"}
cyw43     = { path = "../../embassy/cyw43"}
cyw43-pio = { path = "../../embassy/cyw43-pio" }
embassy-futures     = { path = "../../embassy/embassy-futures"}
embassy-net     = { path = "../../embassy/embassy-net"}
embassy-rp     = { path = "../../embassy/embassy-rp"}
embassy-time     = { path = "../../embassy/embassy-time"}
embassy-usb     = { path = "../../embassy/embassy-usb"}
embassy-usb-logger     = { path = "../../embassy/embassy-usb-logger"}
Step 1: parallelism, diode, logs
In the first step, we won't use Lego parts yet, we won't remote control the Pico, but we'll check the build chain work, that our program can have async tasks, and that we can display the log on the computer.
There's also a push button to make it easier to reinstall a new program.
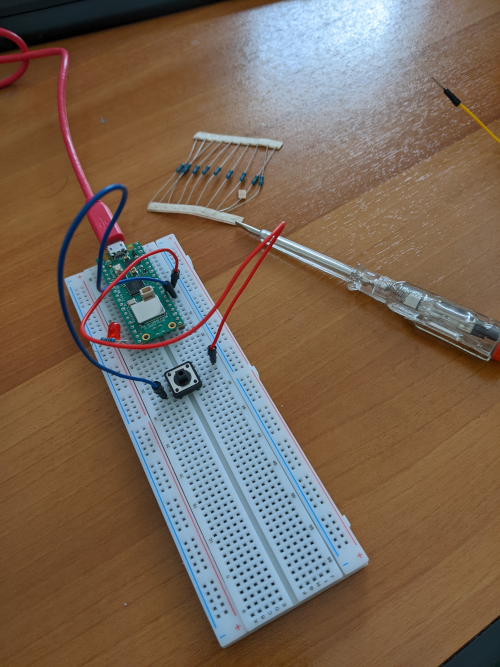
Hardware Setup
Put the Pico on the breadboard, firmly pressed so that the headers have a good connection.
Use the breadboard to chain a resistor of 220 Ohm and a diode (longest arm first) from the GPIO15 pin (in green and labelled "GP15" at the bottom left on the diagram above) to any GND (black in the diagram).
Put a push-button between RUN (in pink on the right in the diagram) and any GND (connect to diagonally opposite pins of the push-button).
Connect the Pico to your computer using the USB cable.
Software design
If you've already used async Rust, the #[embassy_executor::main] attribute before the main won't surprise you. It's a little more complex in Embassy than in eg tokio because we're in no_std.
It creates the entry point (there's no OS to call a main()), initializes the async executor, spawns our main function, and starts polling tasks.
There's more boilerplate, that you'll see in the code below, creating an Irqs struct which receives hardware interrupts, initializing the peripherals, the USB driver, and binding the pins to read or write.
You'll see some statically sized buffers: remember, we're in no-std, there's no allocator.
To demonstrate asynchronism, our program declares two explicit async tasks which will run in parallel (and in parallel of the Embassy ones):
- a task logging a message on USB every second
- a task turning our LED alternatively ON and OFF on a seconds period
You'll notice a SliceWriter struct defined in a second file: it makes it possible to use write! macros by writing to a statically sized buffer implementing fmt::Write.
The program
src/main.rs
#![no_std]
#![no_main]

mod slice_writer;

use {
    core::fmt::Write,
    embassy_executor::Spawner,
    embassy_futures::join::{
        join,
        join3,
        join_array,
    },
    embassy_rp::{
        bind_interrupts,
        gpio::{
            Level,
            Output,
        },
        peripherals::USB,
        usb::{
            Driver,
            InterruptHandler,
        },
    },
    embassy_time::Timer,
    embassy_usb::{
        class::cdc_acm::{
            CdcAcmClass,
            State,
        },
        Builder,
    },
    slice_writer::SliceWriter,
    panic_halt as _,
};

// Embedded devices react to hardware events through interrupts,
// lightweight callbacks triggered by peripherals such as USB controllers
// and timers. This macro statically binds the USB hardware interrupts
// to the Embassy handler
bind_interrupts!(struct Irqs {
    USBCTRL_IRQ => InterruptHandler<USB>;
});

#[embassy_executor::main]
async fn main(_spawner: Spawner) {
    // Initialize the RP2040 peripherals. The embassy_rp::init() function
    // configures the clocks, USB bus, and GPIOs.
    let peripherals = embassy_rp::init(Default::default());

    // Initializes the USB driver by passing the Irqs interrupt structure
    let driver = Driver::new(peripherals.USB, Irqs);

    // Configuration of pin GP15 (physical pin 20) as output
    let mut led = Output::new(peripherals.PIN_15, Level::Low);

    // Configuration of the USB device, with the CDC ACM class
    // for serial communication
    let mut config = embassy_usb::Config::new(0xc0de, 0xcafe);
    config.manufacturer = Some("dystroy");
    config.product = Some("Pico Mobile - log");
    config.serial_number = Some("12345678");
    config.max_power = 100;
    config.max_packet_size_0 = 64;
    let mut config_descriptor = [0; 256];
    let mut bos_descriptor = [0; 256];
    let mut control_buf = [0; 64];
    let mut state = State::new();
    let mut builder = Builder::new(
        driver,
        config,
        &mut config_descriptor,
        &mut bos_descriptor,
        &mut [],
        &mut control_buf,
    );
    let mut class = CdcAcmClass::new(&mut builder, &mut state, 64);
    let mut usb = builder.build();

    // Execution of all async tasks: USB, log, and LED blinking
    let usb_fut = usb.run();

    let log_fut = async {
        let mut buffer = [0u8; 100];
        let mut writer = SliceWriter::new(&mut buffer);
        let mut n = 0;
        loop {
            // Wait for the serial port to be opened on the computer side
            // (e.g., via tio)
            class.wait_connection().await;
            n += 1;
            writer.reset();
            if write!(writer, "Message n° {n}\r\n").is_ok() {
                let _ = class
                    .write_packet(writer.as_bytes())
                    .await;
            }
            Timer::after_secs(1).await;
        }
    };

    let blink_fut = async {
        loop {
            led.set_high();
            Timer::after_millis(5000).await;
            led.set_low();
            Timer::after_millis(5000).await;
        }
    };

    join3(usb_fut, log_fut, blink_fut).await;
}
src/slice_writer.rs
use core::fmt::Write;

/// Wraps a mutable byte slice and implements the `Write` trait for it,
/// allowing formatted strings to be written into the slice.
pub struct SliceWriter<'a> {
    buf: &'a mut [u8],
    cursor: usize,
}

impl SliceWriter<'_> {
    pub fn new(buf: &mut [u8]) -> SliceWriter<'_> {
        SliceWriter { buf, cursor: 0 }
    }
    pub fn reset(&mut self) {
        self.cursor = 0;
    }
    pub fn as_bytes(&self) -> &[u8] {
        &self.buf[..self.cursor]
    }
}

impl<'a> Write for SliceWriter<'a> {
    fn write_str(&mut self, s: &str) -> core::fmt::Result {
        let bytes = s.as_bytes();
        if self.cursor + bytes.len() > self.buf.len() {
            return Err(core::fmt::Error);
        }
        self.buf[self.cursor..self.cursor + bytes.len()]
            .copy_from_slice(bytes);
        self.cursor += bytes.len();
        Ok(())
    }
}
Make it run
For elf2uf2-rs to be able to write the program on the Pico, it needs to be mounted on the computer (which also means there's no other program running on the microcontroller).
Without our push button, we'd need to unplug the USB, press the BOOTSEL button on the Pico and keep it pressed until the USB cable is plugged.
The push button makes it a little easier: the sequence is now
- press the BOOTSEL button
- push the push-button (no need to keep it pressed)
- release the BOOTSEL button
After that, the Pico is mounted and appears like a USB disk on your computer.
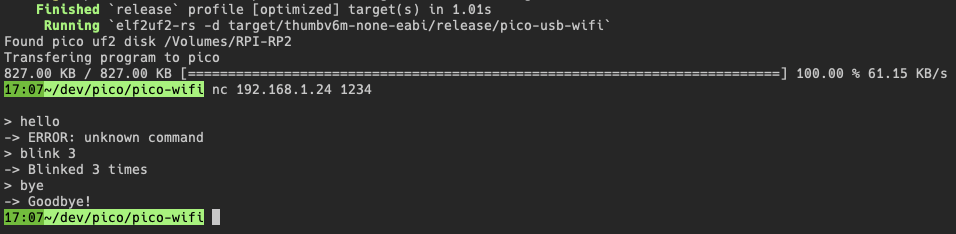
Run cargo run --release which should install (and launch) the program on the Pico.
You should immediately see the diode blink.
To see the log lines, run tio -l, which should list the Pico under a name starting with /dev/tty.usbmodem.
Connect with tio /dev/tty.usbmodem* (or the complete name if you prefer).
The log lines should appear.
There's no need to stop tio when you stop or unplug the Pico but if you want to quit it, do ctrl-T Q.
Step 2: Listen to Wifi
No need to change the hardware circuit for this step which is only dedicated to checking the Pico can register on the local Wifi network and listen for commands sent over TCP.
Software design
We'll send commands through TCP, one line per command.
So we define a Command enum, with a FromStr impl so that it can be parsed from strings.
At this point, we'll have only 2 variants: one to blink the LED and one to close the socket:
#[derive(Debug, Clone, Copy, PartialEq, Eq)]
pub enum Command {
    Blink(u8),
    Bye,
}
Thanks to embassy-net, the bidirectional socket handling is very similar to what you'd have in a program running on a computer, with its socket.accept, socket.write, socket.read.
With some additional gymnastics to deal with the lack of dynamic allocation.
In the previous program, we used join3 to run 3 async blocks in parallel.
This approach can't be extended to arbitrary numbers of futures unless they have the same type, so a different solution is used when the program becomes more complex.
The wifi program introduces a new attribute, #[embassy_executor::task]: it declares an async task which we will later spawn.
I'm not going to promote putting your Wifi password in source control so the build depends on WIFI_SSID and WIFI_PASSWORD env vars. They're integrated in the binary at compile time with the env! macro.
There are many ways to set env vars, for example directly on build with WIFI_SSID="my_network" WIFI_PASSWORD="my_password" cargo run.
StaticCell allows safely initializing global storage at runtime, which is useful in no_std programs where heap allocation is unavailable.
The program
src/slice_writer.rs
use core::fmt::Write;

/// Wraps a mutable byte slice and implements the `Write` trait for it,
/// allowing formatted strings to be written into the slice.
pub struct SliceWriter<'a> {
    buf: &'a mut [u8],
    cursor: usize,
}

impl SliceWriter<'_> {
    pub fn new(buf: &mut [u8]) -> SliceWriter<'_> {
        SliceWriter { buf, cursor: 0 }
    }
    pub fn reset(&mut self) {
        self.cursor = 0;
    }
    pub fn as_bytes(&self) -> &[u8] {
        &self.buf[..self.cursor]
    }
}

impl<'a> Write for SliceWriter<'a> {
    fn write_str(&mut self, s: &str) -> core::fmt::Result {
        let bytes = s.as_bytes();
        if self.cursor + bytes.len() > self.buf.len() {
            return Err(core::fmt::Error);
        }
        self.buf[self.cursor..self.cursor + bytes.len()]
            .copy_from_slice(bytes);
        self.cursor += bytes.len();
        Ok(())
    }
}
src/command.rs
use core::str::FromStr;

#[derive(Debug, Clone, Copy, PartialEq, Eq)]
pub enum Command {
    Blink(u8), // number of times to blink
    Bye,
}

impl FromStr for Command {
    type Err = &'static str;

    fn from_str(s: &str) -> Result<Self, Self::Err> {
        let mut parts = s.split_whitespace();
        let command = parts.next().ok_or("empty command")?;
        match command {
            "blink" => {
                let count_str = parts.next()
                    .ok_or("Blink command missing a count")?;
                let count = count_str
                    .parse::<u8>()
                    .map_err(|_| "count not parsable as u8")?;
                Ok(Command::Blink(count))
            }
            "bye" => Ok(Command::Bye),
            _ => Err("unknown command"),
        }
    }
}
src/main.rs
#![no_std]
#![no_main]

mod command;
mod slice_writer;
use {
    command::*,
    slice_writer::*,
};

use {
    core::{
        fmt::Write as _,
        str::from_utf8,
    },
    cyw43::{
        aligned_bytes,
        JoinOptions,
    },
    cyw43_pio::{
        PioSpi,
        DEFAULT_CLOCK_DIVIDER,
    },
    embassy_executor::Spawner,
    embassy_net::{
        tcp::TcpSocket,
        Config,
        StackResources,
    },
    embassy_rp::{
        bind_interrupts,
        clocks::RoscRng,
        dma,
        gpio::{
            Level,
            Output,
        },
        peripherals::{
            DMA_CH0,
            DMA_CH1,
            PIO0,
            USB,
        },
        pio::{
            InterruptHandler,
            Pio,
        },
        usb::{
            Driver as UsbDriver,
            InterruptHandler as UsbIrqHandler,
        },
    },
    embassy_time::{
        Duration,
        Timer,
    },
    embedded_io_async::Write,
    log::{
        info,
        warn,
    },
    panic_halt as _,
    static_cell::StaticCell,
};

bind_interrupts!(struct Irqs {
    PIO0_IRQ_0 => InterruptHandler<PIO0>;
    DMA_IRQ_0 => dma::InterruptHandler<DMA_CH0>, dma::InterruptHandler<DMA_CH1>;
    USBCTRL_IRQ => UsbIrqHandler<USB>;
});

const WIFI_NETWORK: &str = env!("WIFI_SSID");
const WIFI_PASSWORD: &str = env!("WIFI_PASSWORD");

#[embassy_executor::task]
async fn cyw43_task(
    runner: cyw43::Runner<
        'static,
        cyw43::SpiBus<Output<'static>, PioSpi<'static, PIO0, 0>>,
        cyw43::Cyw43439,
    >,
) -> ! {
    runner.run().await
}

#[embassy_executor::task]
async fn net_task(mut runner: embassy_net::Runner<'static, cyw43::NetDriver<'static>>) -> ! {
    runner.run().await
}

#[embassy_executor::task]
async fn logger_task(driver: UsbDriver<'static, USB>) {
    embassy_usb_logger::run!(1024, log::LevelFilter::Info, driver);
}

#[embassy_executor::task]
async fn tick() {
    let mut i = 0;
    loop {
        Timer::after_millis(10_000).await;
        i += 1;
        log::info!("tick {i}");
    }
}

/// Helper function to handle fatal errors in async tasks.
/// Logs the error, waits for a short duration so that the message can
/// arrive to the computer, and then panics.
async fn expect<T, E: core::fmt::Display>(res: Result<T, E>) -> T {
    match res {
        Ok(v) => v,
        Err(e) => {
            log::error!("Fatal error: {}", e);
            Timer::after_millis(100).await;
            panic!("Fatal error: {}", e);
        }
    }
}

#[embassy_executor::main]
async fn main(spawner: Spawner) {
    let p = embassy_rp::init(Default::default());

    // Logger USB — must be before everything else
    let usb_driver = UsbDriver::new(p.USB, Irqs);
    spawner.spawn(expect(logger_task(usb_driver)).await);

    info!("Starting...");

    // LED on pin 15, active=high
    let mut led = Output::new(p.PIN_15, Level::Low);

    spawner.spawn(expect(tick()).await);

    let mut rng = RoscRng;

    let fw = aligned_bytes!("../../cyw43-firmware/43439A0.bin");
    let clm = aligned_bytes!("../../cyw43-firmware/43439A0_clm.bin");
    let nvram = aligned_bytes!("../../cyw43-firmware/nvram_rp2040.bin");

    let pwr = Output::new(p.PIN_23, Level::Low);
    let cs = Output::new(p.PIN_25, Level::High);
    let mut pio = Pio::new(p.PIO0, Irqs);
    let spi = PioSpi::new(
        &mut pio.common,
        pio.sm0,
        DEFAULT_CLOCK_DIVIDER,
        pio.irq0,
        cs,
        p.PIN_24,
        p.PIN_29,
        dma::Channel::new(p.DMA_CH0, Irqs),
        dma::Channel::new(p.DMA_CH1, Irqs),
    );

    static STATE: StaticCell<cyw43::State> = StaticCell::new();
    let state = STATE.init(cyw43::State::new());
    let (net_device, mut control, runner) = cyw43::new(state, pwr, spi, fw, nvram).await;
    spawner.spawn(expect(cyw43_task(runner)).await);

    control.init(clm).await;
    control
        .set_power_management(cyw43::PowerManagementMode::PowerSave)
        .await;

    let config = Config::dhcpv4(Default::default());

    // Generate random seed
    let seed = rng.next_u64();

    // Init network stack
    static RESOURCES: StaticCell<StackResources<3>> = StaticCell::new();
    let (stack, runner) = embassy_net::new(
        net_device,
        config,
        RESOURCES.init(StackResources::new()),
        seed,
    );

    spawner.spawn(expect(net_task(runner)).await);

    while let Err(err) = control
        .join(WIFI_NETWORK, JoinOptions::new(WIFI_PASSWORD.as_bytes()))
        .await
    {
        info!("join failed: {:?}", err);
    }

    info!("waiting for link...");
    stack.wait_link_up().await;

    info!("waiting for DHCP...");
    stack.wait_config_up().await;

    // And now we can use it!
    info!("Stack is up!");

    let mut rx_buffer = [0; 4096];
    let mut tx_buffer = [0; 4096];
    let mut buf = [0; 4096];

    loop {
        let mut socket = TcpSocket::new(stack, &mut rx_buffer, &mut tx_buffer);
        socket.set_timeout(Some(Duration::from_secs(10)));

        control.gpio_set(0, false).await;
        info!("Listening on TCP:1234...");
        led.set_high();
        Timer::after_millis(100).await;
        led.set_low();
        if let Err(e) = socket.accept(1234).await {
            warn!("accept error: {:?}", e);
            continue;
        }

        info!("Received connection from {:?}", socket.remote_endpoint());
        control.gpio_set(0, true).await;

        loop {
            let _ = socket.write_all(b"\n> ").await;
            let n = match socket.read(&mut buf).await {
                Ok(0) => {
                    warn!("read EOF");
                    break;
                }
                Ok(n) => n,
                Err(e) => {
                    warn!("read error: {:?}", e);
                    break;
                }
            };
            let Ok(input) = from_utf8(&buf[..n]) else {
                warn!("Received non-UTF8 data");
                continue;
            };

            info!(" <- Received '{}'", input);
            let cmd = input.parse::<Command>();

            let mut output = SliceWriter::new(&mut buf);
            let mut quit = false;
            match cmd {
                Ok(Command::Blink(n)) => {
                    for _ in 0..=n {
                        led.set_high();
                        Timer::after_millis(100).await;
                        led.set_low();
                        Timer::after_millis(100).await;
                    }
                    let _ = write!(output, "-> Blinked {} times", n);
                }
                Ok(Command::Bye) => {
                    let _ = write!(output, "-> Goodbye!");
                    quit = true;
                }
                Err(e) => {
                    let _ = write!(output, "-> ERROR: {}", e);
                }
            }

            match socket.write_all(output.as_bytes()).await {
                Ok(()) => {
                    info!("Answered '{}'", output.as_str());
                }
                Err(e) => {
                    warn!("write error: {:?}", e);
                    break;
                }
            };
            if quit {
                info!("Closing connection");
                break;
            }
        }
        Timer::after_millis(10).await;
    }
}
Make it run
First ready the Pico with the press BootSel, push push-button, release BootSel sequence, then do cargo run to install the program.
Use tio to display the log, as for the previous program.
On launching, the Pico registers and dumps its IP:
waiting for DHCP...
IPv4: UP
   IP address:      Cidr { address: 192.168.1.24, prefix_len: 24 }
   Default gateway: Some(192.168.1.1)
Stack is up!
Listening on TCP:1234...
Connect with nc, eg nc 192.168.1.24 1234 and send commands finished by enter.
Home routers usually keep giving the same IP, so you'll just keep the complete command in history.
Step 3: Lego Power
There's no point in sending commands over Wifi if the car needs a cable for power.
The usual solution to that is to plug a powerbank, but we'll need a Lego powerpack for the motor and servo, and we don't want the weight of two sets of batteries.
So, we'll use the Lego power bank, which holds 6 AA 1.5V batteries (total = 9V) to power the Pico.
The Pico runs on a 3.3V power. Its own board has regulators and accepts between 1.8V and 5.5V but would immediately be destroyed by a 9V one. That's where we'll use the Kitronik 5331 controller, as it can accept from 5V to 10V to power the Pico.
Hardware Setup
First, remove the Pico from the breadboard, and plug it into the Kitronik. See diagram.
The small image below, taken from the Kubii site, shows how the Pico fits the Kitronik:
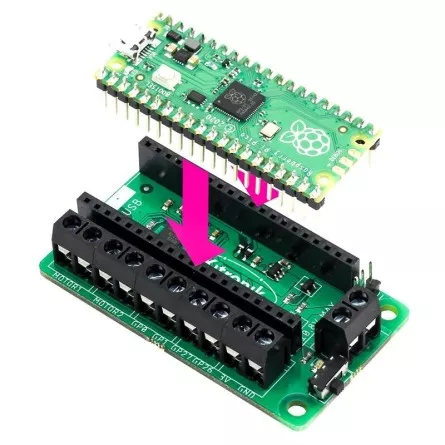
It must go fully down for correct contacts.
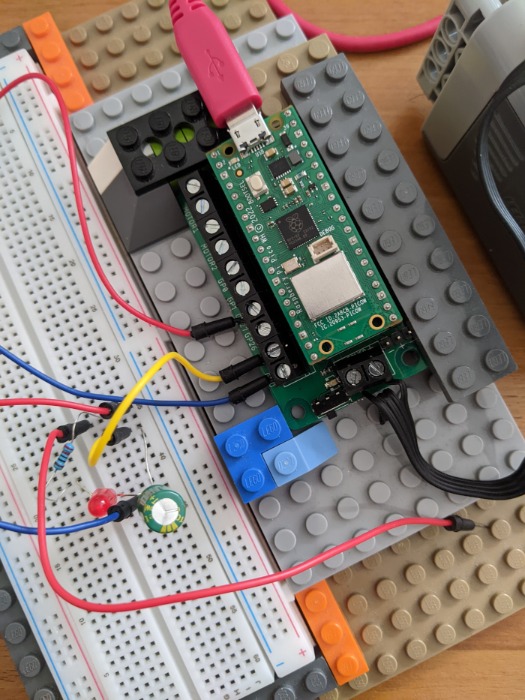
As you'll have wires going from the breadboard to the Kitronik, you want them to stay together, so you should build a Lego casing as I did. This will also make it easier later on to fix it on the car.
Try to let the power and motor pins of the Kitronik easily accessible.
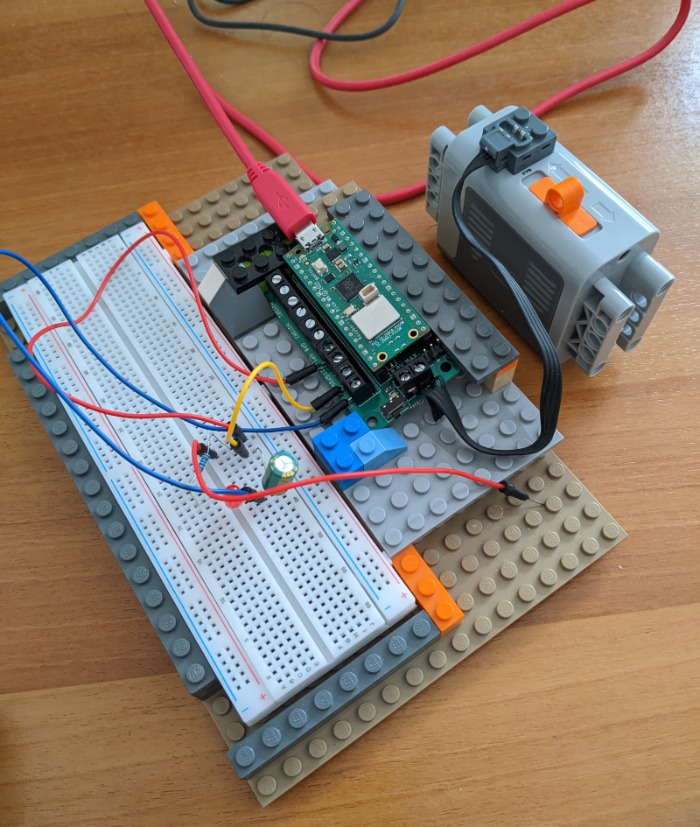
Here it is viewed from above for wiring clarity:
Cut a Lego flat Power Functions cable. It's made of 4 wires.
The 2 external ones are for power.
The one on right as seen from above is the +.
Strip 5 mm of insulation from the two outer wires and fold the middle wires so that they don't get in the way.
Look under the Kitronik. You'll see what pins are for Power - and +.
Triple-check as you don't want to wire it wrong: the Lego's + goes to the Kitronik's +, the - goes to the -.
We can't access the Pico's pins directly anymore, we'll go through the Kitronik to put back the diode: A resistance (eg 220 Ohm) followed by a diode (longer arm first) connected from Kitronik's GP27 to its GND.
To protect the Pico and Kitronik from overtension (which is very likely in the following steps whit a motor and servo), put a capacitor (I've taken a 100μF one but a smaller one is probably OK too) between the 3V (+) pin and the GND (-) pin of the Kitronik. Be careful: the longer arm goes in the +.
Software design
You probably noticed there's no push-button anymore.
The reason is that there's no way to access the RUN pin anymore.
But there's a much better solution (as long as our program doesn't crash): there's an API to reset the Pico into the USB bootloader: reset_to_usb_boot.
It means the reset is program driven, so we add a Quit variant in our Command enum, and we call reset_to_usb_boot in the main loop when the event is received (as this instantly terminates the program, we first log and wait a little).
The led isn't initialized anymore from PIN_15, which isn't made available by the Kitronik, so we use PIN_27 which matches the Kitronik's GP27.
Rest of the code doesn't change.
The program
src/main.rs
#![no_std]
#![no_main]

mod command;
mod slice_writer;
use {
    command::*,
    slice_writer::*,
};

use {
    core::{
        str::from_utf8,
        fmt::Write as _,
    },
    cyw43::{
        aligned_bytes,
        JoinOptions,
    },
    cyw43_pio::{
        PioSpi,
        DEFAULT_CLOCK_DIVIDER,
    },
    embassy_executor::Spawner,
    embassy_net::{
        tcp::TcpSocket,
        Config,
        StackResources,
    },
    embassy_rp::{
        bind_interrupts,
        clocks::RoscRng,
        dma,
        gpio::{
            Level,
            Output,
        },
        peripherals::{
            DMA_CH0,
            DMA_CH1,
            PIO0,
            USB,
        },
        pio::{
            InterruptHandler,
            Pio,
        },
        usb::{
            Driver as UsbDriver,
            InterruptHandler as UsbIrqHandler,
        },
    },
    embassy_time::{
        Duration,
        Timer,
    },
    embedded_io_async::Write,
    log::{
        info,
        warn,
    },
    panic_halt as _,
    rp2040_hal::rom_data::reset_to_usb_boot,
    static_cell::StaticCell,
};

bind_interrupts!(struct Irqs {
    PIO0_IRQ_0 => InterruptHandler<PIO0>;
    DMA_IRQ_0 => dma::InterruptHandler<DMA_CH0>, dma::InterruptHandler<DMA_CH1>;
    USBCTRL_IRQ => UsbIrqHandler<USB>;
});

const WIFI_NETWORK: &str = env!("WIFI_SSID");
const WIFI_PASSWORD: &str = env!("WIFI_PASSWORD");

#[embassy_executor::task]
async fn cyw43_task(
    runner: cyw43::Runner<
        'static,
        cyw43::SpiBus<Output<'static>, PioSpi<'static, PIO0, 0>>,
        cyw43::Cyw43439,
    >,
) -> ! {
    runner.run().await
}

#[embassy_executor::task]
async fn net_task(mut runner: embassy_net::Runner<'static, cyw43::NetDriver<'static>>) -> ! {
    runner.run().await
}

#[embassy_executor::task]
async fn logger_task(driver: UsbDriver<'static, USB>) {
    embassy_usb_logger::run!(1024, log::LevelFilter::Info, driver);
}

#[embassy_executor::task]
async fn tick() {
    let mut i = 0;
    loop {
        Timer::after_millis(10_000).await;
        i += 1;
        log::info!("tick {i}");
    }
}

async fn expect<T, E: core::fmt::Display>(res: Result<T, E>) -> T {
    match res {
        Ok(v) => v,
        Err(e) => {
            log::error!("Fatal error: {}", e);
            Timer::after_millis(100).await;
            panic!("Fatal error: {}", e);
        }
    }
}

#[embassy_executor::main]
async fn main(spawner: Spawner) {
    let p = embassy_rp::init(Default::default());

    // Logger USB — must be before everything else
    let usb_driver = UsbDriver::new(p.USB, Irqs);
    spawner.spawn(expect(logger_task(usb_driver)).await);

    info!("Starting...");

    // LED on pin GP27 of the Kitronik 5331, active=high
    let mut led = Output::new(p.PIN_27, Level::Low);

    spawner.spawn(expect(tick()).await);

    let mut rng = RoscRng;

    let fw = aligned_bytes!("../../cyw43-firmware/43439A0.bin");
    let clm = aligned_bytes!("../../cyw43-firmware/43439A0_clm.bin");
    let nvram = aligned_bytes!("../../cyw43-firmware/nvram_rp2040.bin");

    let pwr = Output::new(p.PIN_23, Level::Low);
    let cs = Output::new(p.PIN_25, Level::High);
    let mut pio = Pio::new(p.PIO0, Irqs);
    let spi = PioSpi::new(
        &mut pio.common,
        pio.sm0,
        DEFAULT_CLOCK_DIVIDER,
        pio.irq0,
        cs,
        p.PIN_24,
        p.PIN_29,
        dma::Channel::new(p.DMA_CH0, Irqs),
        dma::Channel::new(p.DMA_CH1, Irqs),
    );

    static STATE: StaticCell<cyw43::State> = StaticCell::new();
    let state = STATE.init(cyw43::State::new());
    let (net_device, mut control, runner) = cyw43::new(state, pwr, spi, fw, nvram).await;
    spawner.spawn(expect(cyw43_task(runner)).await);

    control.init(clm).await;
    control
        .set_power_management(cyw43::PowerManagementMode::PowerSave)
        .await;

    let config = Config::dhcpv4(Default::default());

    // Generate random seed
    let seed = rng.next_u64();

    // Init network stack
    static RESOURCES: StaticCell<StackResources<3>> = StaticCell::new();
    let (stack, runner) = embassy_net::new(
        net_device,
        config,
        RESOURCES.init(StackResources::new()),
        seed,
    );

    spawner.spawn(expect(net_task(runner)).await);

    while let Err(err) = control
        .join(WIFI_NETWORK, JoinOptions::new(WIFI_PASSWORD.as_bytes()))
        .await
    {
        info!("join failed: {:?}", err);
    }

    info!("waiting for link...");
    stack.wait_link_up().await;

    info!("waiting for DHCP...");
    stack.wait_config_up().await;

    // And now we can use it!
    info!("Stack is up!");

    let mut rx_buffer = [0; 4096];
    let mut tx_buffer = [0; 4096];
    let mut buf = [0; 4096];

    loop {
        let mut socket = TcpSocket::new(stack, &mut rx_buffer, &mut tx_buffer);
        socket.set_timeout(Some(Duration::from_secs(10)));

        control.gpio_set(0, false).await;
        info!("Listening on TCP:1234...");
        led.set_high();
        Timer::after_millis(100).await;
        led.set_low();
        if let Err(e) = socket.accept(1234).await {
            warn!("accept error: {:?}", e);
            continue;
        }

        info!("Received connection from {:?}", socket.remote_endpoint());
        control.gpio_set(0, true).await;

        loop {
            let _ = socket.write_all(b"\n> ").await;
            let n = match socket.read(&mut buf).await {
                Ok(0) => {
                    warn!("read EOF");
                    break;
                }
                Ok(n) => n,
                Err(e) => {
                    warn!("read error: {:?}", e);
                    break;
                }
            };
            let Ok(input) = from_utf8(&buf[..n]) else {
                warn!("Received non-UTF8 data");
                continue;
            };

            info!(" <- Received '{}'", input);
            let cmd = input.parse::<Command>();

            let mut output = SliceWriter::new(&mut buf);
            let mut close = false;
            match cmd {
                Ok(Command::Blink(n)) => {
                    for _ in 0..=n {
                        led.set_high();
                        Timer::after_millis(100).await;
                        led.set_low();
                        Timer::after_millis(100).await;
                    }
                    let _ = write!(output, "-> Blinked {} times", n);
                }
                Ok(Command::Bye) => {
                    let _ = write!(output, "-> Goodbye!");
                    close = true;
                }
                Ok(Command::Quit) => {
                    let _ = write!(output, "-> Shutting down...");
                    Timer::after_millis(100).await;
                    reset_to_usb_boot(0, 0);
                }
                Err(e) => {
                    let _ = write!(output, "-> ERROR: {}", e);
                }
            }

            match socket.write_all(output.as_bytes()).await {
                Ok(()) => {
                    info!("Answered '{}'", output.as_str());
                }
                Err(e) => {
                    warn!("write error: {:?}", e);
                    break;
                }
            };
            if close {
                info!("Closing connection");
                break;
            }
        }
        Timer::after_millis(10).await;
    }
}
src/command.rs
use core::str::FromStr;

#[derive(Debug, Clone, Copy, PartialEq, Eq)]
pub enum Command {
    /// Blink a LED a number of times
    Blink(u8),
    /// Disconnect the client, but keep the server running
    Bye,
    /// Disconnect the client and shut down the Pico (back to the bootloader)
    Quit,
}

impl FromStr for Command {
    type Err = &'static str;

    fn from_str(s: &str) -> Result<Self, Self::Err> {
        let mut parts = s.split_whitespace();
        let command = parts.next().ok_or("empty command")?;
        match command {
            "blink" | "b" => {
                let count_str = parts.next()
                    .ok_or("Blink command missing a count")?;
                let count = count_str
                    .parse::<u8>()
                    .map_err(|_| "count not parsable as u8")?;
                Ok(Command::Blink(count))
            }
            "bye" => Ok(Command::Bye),
            "q" | "quit" => Ok(Command::Quit),
            _ => Err("unknown command"),
        }
    }
}
src/slice_writer.rs
use core::fmt::Write;

/// Wraps a mutable byte slice and implements the `Write` trait for it,
/// allowing formatted strings to be written into the slice.
pub struct SliceWriter<'a> {
    buf: &'a mut [u8],
    cursor: usize,
}

impl SliceWriter<'_> {
    pub fn new(buf: &mut [u8]) -> SliceWriter<'_> {
        SliceWriter { buf, cursor: 0 }
    }
    pub fn reset(&mut self) {
        self.cursor = 0;
    }
    pub fn as_bytes(&self) -> &[u8] {
        &self.buf[..self.cursor]
    }
}

impl<'a> Write for SliceWriter<'a> {
    fn write_str(&mut self, s: &str) -> core::fmt::Result {
        let bytes = s.as_bytes();
        if self.cursor + bytes.len() > self.buf.len() {
            return Err(core::fmt::Error);
        }
        self.buf[self.cursor..self.cursor + bytes.len()]
            .copy_from_slice(bytes);
        self.cursor += bytes.len();
        Ok(())
    }
}
Make it run
Install as before.
Connect with tio /dev/tty.usbmodem* to see the logs, and connect with netcat as you did before (the command is in your history, right ?).
There are 2 differences in usage:
- you can unplug the USB. If there's at least one power source, either the USB cable or the Lego power pack, the program will start and run.
- to install a new version, you don't need to touch buttons, just send
qwith netcat
Of course the USB cable must be plugged when doing cargo run to install the program.
Step 4: Motor and servo
Now we'll plug the motor and servomotor, and control them.
The motor is the easy part, both regarding wiring and programming. The servo is a little trickier.
Hardware design
First, let's wire the motor.
Take the other half of the previous flat Lego cable. This time we don't need the external wires but the internal ones. Strip 5 millimeters of the internal wires, separate them slightly, and fold back the external wires.
The 2 internal wires go to the Motor1 pins of the Kitronik (order doesn't matter, it only changes the direction of rotation and it's easier to reverse it in software).
Plug the motor to the normal end of the cable, by stacking Lego cable connectors.
At this point, it should look like this:
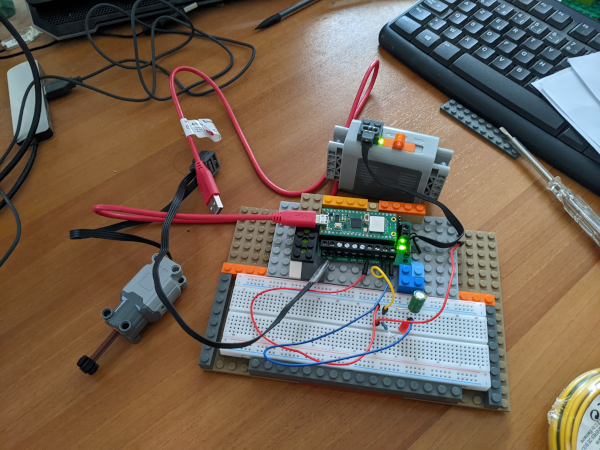
Now to the servo's wiring.
Cut another flat cable in two. We now need the four wires, and to have them well separated. This is a delicate operation if you have fat fingers like me, I had to put some adhesive tape to protect where I had cut the protection.
You should probably do as I did: label the + and - wires so that you don't plug them wrong (which would definitely toast something).
The + and - go to the power + and - of the kitronik.
The 2 internal wires must be plugged into the Motor2 pins of the Kitronik.
Try to make it look better than this:
Motor control
A lego motor rotation can be off, and turn in either direction. The Motor1 pins of the Kitronik match the PIN_2 and PIN_3 logical pins, and the direction is decided as this:
| GP2 (PIN_2) | GP3 (PIN_2) | Motor effect |
|---|---|---|
| Low | Low | No rotation (but no resistance so it may go on with inertia) |
| Low | High | Forward |
| High | Low | Backward |
| High | High | No rotation, braking |
Setting pins Low and High is exactly how we control the diode already, there's no problem.
If you're really interested in modulating the speed, you could send an impulsion modulation signal using embassy_rp::pwm (we'll see how it works for the servo).
Servo control
The Lego's servo command is a little weird (it's a later addition which came when the cables and control system of Power Functions was already defined).
The servo is controlled with a signal at a fixed frequency (about 1200Hz) but with "Pulse Width Modulation" (PWM), meaning that the relative length of the on and off steps vary.
The Pico builds the signal at 3.3V, and the Kitronik changes it to 9V which is the requirement of the Lego servo. In rust we can define this thanks to the embassy_rp::pwm module.
When both pins are at Low, the servo centers.
The Lego servo interprets a PWM signal on one channel while the other channel is held low. The duty cycle selects one of several steering positions.
| Level | Duty Cycle | Angle |
|---|---|---|
| 0 | 0% | 0° (center) |
| 1 | 26.6% | 13° |
| 2 | 38.9% | 26° |
| 3 | 51.2% | 39° |
| 4 | 63.0% | 52° |
| 5 | 75.0% | 65° |
| 6 | 87.2% | 78° |
| 7 | 100% | 90° |
Disclaimer: I'm not at all sure of all those values and didn't find direct tables in the various reverse-engineering documents that can be found online. There's a lot of assumption here so take this part as useful to build the pico-mobile but NOT as authoritative content!
Software design
Note this line:
control.set_power_management(cyw43::PowerManagementMode::PowerSave).await;
It reduces the strain on the power and (probably) reduces the risk of overtensions on motor transitions.
We need commands, that we can send with netcat, to try the behavior of the servo and motor, so here's the new Commands enum:
pub enum Command {
    /// Blink a LED a number of times
    Blink(u8),
    /// Disconnect the client, but keep the server running
    Bye,
    /// Disconnect the client and shut down the Pico
    /// (back to the bootloader)
    Quit,
    /// Go forward (positive) or backward (negative)
    /// for a number of milliseconds
    GoMillis(i32),
    /// Turn left, right, or center the steering
    /// with a certain level of intensity (0-7)
    Steer {
        direction: SteeringDirection,
        level: u8, // in [1-7]
    },
}
To make the code clearer, we define two files, and structs, for the motor and servo.
The Motor impl is straightforward, as it's just setting two pins to Low and High.
The LegoServer struct's logic is, as we saw, to set the "duty cycle" of one of the two channels but finding one's way in the RP and embassy pwm API is a little harder as you'll see if you decipher servo.rs.
The Program
src/command.rs
use {
    crate::SteeringDirection,
    core::str::FromStr,
};

#[derive(Debug, Clone, Copy, PartialEq, Eq)]
pub enum Command {
    /// Blink a LED a number of times
    Blink(u8),
    /// Disconnect the client, but keep the server running
    Bye,
    /// Disconnect the client and shut down the Pico
    /// (back to the bootloader)
    Quit,
    /// Go forward (positive) or backward (negative)
    /// for a number of milliseconds
    GoMillis(i32),
    /// Turn left, right, or center the steering
    /// with a certain level of intensity (0-7)
    Steer {
        direction: SteeringDirection,
        level: u8, // in [1-7]
    },
}

impl FromStr for Command {
    type Err = &'static str;

    fn from_str(s: &str) -> Result<Self, Self::Err> {
        let mut parts = s.split_whitespace();
        let command = parts.next().ok_or("empty command")?;
        match command {
            "blink" | "b" => {
                let count_str = parts.next()
                    .ok_or("Blink command missing a count")?;
                let count = count_str
                    .parse::<u8>()
                    .map_err(|_| "count not parsable as u8")?;
                Ok(Command::Blink(count))
            }
            "go" | "g" => {
                let count_str = parts.next()
                    .ok_or("Blink command missing a count")?;
                let count = count_str
                    .parse::<i32>()
                    .map_err(|_| "count not parsable as i32")?;
                Ok(Command::GoMillis(count))
            }
            "l" | "left" => {
                let level_str = parts.next()
                    .ok_or("Steer left command missing a level")?;
                let level = level_str
                    .parse::<u8>()
                    .map_err(|_| "level not parsable as u8")?;
                if level > 7 {
                    return Err("level must be between 1 and 7");
                }
                Ok(Command::Steer {
                    direction: SteeringDirection::Left,
                    level,
                })
            }
            "r" |"right" => {
                let level_str = parts.next()
                    .ok_or("Steer right command missing a level")?;
                let level = level_str
                    .parse::<u8>()
                    .map_err(|_| "level not parsable as u8")?;
                if level > 7 {
                    return Err("level must be between 1 and 7");
                }
                Ok(Command::Steer {
                    direction: SteeringDirection::Right,
                    level,
                })
            }
            "c" | "center" => Ok(Command::Steer {
                direction: SteeringDirection::Center,
                level: 0,
            }),
            "bye" => Ok(Command::Bye),
            "q" | "quit" => Ok(Command::Quit),
            _ => Err("unknown command"),
        }
    }
}
src/main.rs
#![no_std]
#![no_main]

mod command;
mod motor;
mod servo;
mod slice_writer;
mod utils;

pub use {
    command::*,
    motor::*,
    servo::*,
    slice_writer::*,
    utils::*,
};

use {
    core::{
        fmt::Write as _,
        str::from_utf8,
    },
    cyw43::{
        aligned_bytes,
        JoinOptions,
    },
    cyw43_pio::{
        PioSpi,
        DEFAULT_CLOCK_DIVIDER,
    },
    embassy_executor::Spawner,
    embassy_net::{
        tcp::TcpSocket,
        Config,
        StackResources,
    },
    embassy_rp::{
        bind_interrupts,
        clocks::RoscRng,
        dma,
        gpio::{
            Level,
            Output,
        },
        peripherals::{
            DMA_CH0,
            DMA_CH1,
            PIO0,
            USB,
        },
        pio::{
            InterruptHandler,
            Pio,
        },
        pwm::{
            Pwm,
        },
        usb::{
            Driver as UsbDriver,
            InterruptHandler as UsbIrqHandler,
        },
    },
    embassy_time::{
        Duration,
        Timer,
    },
    embedded_io_async::Write,
    log::{
        info,
        warn,
    },
    panic_halt as _,
    rp2040_hal::rom_data::reset_to_usb_boot,
    static_cell::StaticCell,
};

bind_interrupts!(struct Irqs {
    PIO0_IRQ_0 => InterruptHandler<PIO0>;
    DMA_IRQ_0 => dma::InterruptHandler<DMA_CH0>, dma::InterruptHandler<DMA_CH1>;
    USBCTRL_IRQ => UsbIrqHandler<USB>;
});

const WIFI_NETWORK: &str = env!("WIFI_SSID");
const WIFI_PASSWORD: &str = env!("WIFI_PASSWORD");

#[embassy_executor::task]
async fn cyw43_task(
    runner: cyw43::Runner<
        'static,
        cyw43::SpiBus<Output<'static>, PioSpi<'static, PIO0, 0>>,
        cyw43::Cyw43439,
    >,
) -> ! {
    runner.run().await
}

#[embassy_executor::task]
async fn net_task(mut runner: embassy_net::Runner<'static, cyw43::NetDriver<'static>>) -> ! {
    runner.run().await
}

#[embassy_executor::task]
async fn logger_task(driver: UsbDriver<'static, USB>) {
    embassy_usb_logger::run!(1024, log::LevelFilter::Info, driver);
}

#[embassy_executor::task]
async fn tick() {
    let mut i = 0;
    loop {
        Timer::after_millis(10_000).await;
        i += 1;
        log::info!("tick {i}");
    }
}

#[embassy_executor::main]
async fn main(spawner: Spawner) {
    let mut p = embassy_rp::init(Default::default());

    // Logger USB — must be before everything else
    let usb_driver = UsbDriver::new(p.USB, Irqs);
    spawner.spawn(expect(logger_task(usb_driver)).await);

    info!("Starting...");

    // LED on pin 27 of the Kitronik 5331, active=high
    let mut led = Output::new(p.PIN_27, Level::Low);

    // Motor on pins Motor1 of the Kitronik 5331, which are mapped
    // to pins 2 and 3 of the RP2040
    let mut motor = Motor::new(
        Output::new(p.PIN_2, Level::Low),
        Output::new(p.PIN_3, Level::Low),
    );

    // Servo on pins Motor2 of the Kitronik 5331,
    // which are mapped to pins 6 and 7 of the RP2040,
    // pins which are handled by the PWM slice 3
    // (On the RP2040, not every GPIO can be attached to every
    //  PWM generator, so the pin choice is partly dictated by
    //  hardware constraints)
    let pwm = Pwm::new_output_ab(
        p.PWM_SLICE3.reborrow(),
        p.PIN_6.reborrow(),
        p.PIN_7.reborrow(),
        LegoServo::pwm_config(),
    );
    let (channel_a, channel_b) = pwm.split();
    let mut servo = LegoServo {
        channel_a: channel_a.unwrap(), // safe ? probably...
        channel_b: channel_b.unwrap(),
    };

    spawner.spawn(expect(tick()).await);

    let mut rng = RoscRng;

    let fw = aligned_bytes!("../../cyw43-firmware/43439A0.bin");
    let clm = aligned_bytes!("../../cyw43-firmware/43439A0_clm.bin");
    let nvram = aligned_bytes!("../../cyw43-firmware/nvram_rp2040.bin");

    let pwr = Output::new(p.PIN_23, Level::Low);
    let cs = Output::new(p.PIN_25, Level::High);
    let mut pio = Pio::new(p.PIO0, Irqs);
    let spi = PioSpi::new(
        &mut pio.common,
        pio.sm0,
        DEFAULT_CLOCK_DIVIDER,
        pio.irq0,
        cs,
        p.PIN_24,
        p.PIN_29,
        dma::Channel::new(p.DMA_CH0, Irqs),
        dma::Channel::new(p.DMA_CH1, Irqs),
    );

    static STATE: StaticCell<cyw43::State> = StaticCell::new();
    let state = STATE.init(cyw43::State::new());
    let (net_device, mut control, runner) = cyw43::new(state, pwr, spi, fw, nvram)
        .await;
    spawner.spawn(expect(cyw43_task(runner)).await);

    control.init(clm).await;
    control
        .set_power_management(cyw43::PowerManagementMode::PowerSave)
        .await;

    let config = Config::dhcpv4(Default::default());

    // Generate random seed
    let seed = rng.next_u64();

    // Init network stack
    static RESOURCES: StaticCell<StackResources<3>> = StaticCell::new();
    let (stack, runner) = embassy_net::new(
        net_device,
        config,
        RESOURCES.init(StackResources::new()),
        seed,
    );

    spawner.spawn(expect(net_task(runner)).await);

    while let Err(err) = control
        .join(WIFI_NETWORK, JoinOptions::new(WIFI_PASSWORD.as_bytes()))
        .await
    {
        info!("join failed: {:?}", err);
    }

    info!("waiting for link...");
    stack.wait_link_up().await;

    info!("waiting for DHCP...");
    stack.wait_config_up().await;

    // And now we can use it!
    info!("Stack is up!");

    let mut rx_buffer = [0; 4096];
    let mut tx_buffer = [0; 4096];
    let mut buf = [0; 4096];

    loop {
        let mut socket = TcpSocket::new(stack, &mut rx_buffer, &mut tx_buffer);
        socket.set_timeout(Some(Duration::from_secs(10)));

        control.gpio_set(0, false).await;
        info!("Listening on TCP:1234...");
        led.set_high();
        Timer::after_millis(100).await;
        led.set_low();
        if let Err(e) = socket.accept(1234).await {
            warn!("accept error: {:?}", e);
            continue;
        }

        info!("Received connection from {:?}", socket.remote_endpoint());
        control.gpio_set(0, true).await;

        loop {
            let _ = socket.write_all(b"\n> ").await;
            let n = match socket.read(&mut buf).await {
                Ok(0) => {
                    warn!("read EOF");
                    break;
                }
                Ok(n) => n,
                Err(e) => {
                    warn!("read error: {:?}", e);
                    break;
                }
            };
            let Ok(input) = from_utf8(&buf[..n]) else {
                warn!("Received non-UTF8 data");
                continue;
            };

            info!(" <- Received '{}'", input);
            let cmd = input.parse::<Command>();

            let mut output = SliceWriter::new(&mut buf);
            let mut close = false;
            match cmd {
                Ok(Command::Blink(n)) => {
                    for _ in 0..=n {
                        led.set_high();
                        Timer::after_millis(100).await;
                        led.set_low();
                        Timer::after_millis(100).await;
                    }
                    let _ = write!(output, "-> Blinked {} times", n);
                }
                Ok(Command::GoMillis(m)) => {
                    motor.go_millis(m).await;
                    if m > 0 {
                        let _ = write!(output, "-> Went forward for {} milliseconds", m);
                    } else if m < 0 {
                        let _ = write!(output, "-> Went backward for {} milliseconds", -m);
                    } else {
                        let _ = write!(output, "-> Didn't move");
                    }
                }
                Ok(Command::Steer { direction, level }) => {
                    servo.set_position(direction, level).await;
                    let dir_str = match direction {
                        SteeringDirection::Left => "left",
                        SteeringDirection::Right => "right",
                        SteeringDirection::Center => "center",
                    };
                    if direction == SteeringDirection::Center {
                        let _ = write!(output, "-> Centered steering");
                    } else {
                        let _ = write!(
                            output,
                            "-> Turned {} with intensity level {}",
                            dir_str, level
                        );
                    }
                }
                Ok(Command::Bye) => {
                    let _ = write!(output, "-> Goodbye!");
                    close = true;
                }
                Ok(Command::Quit) => {
                    let _ = write!(output, "-> Shutting down...");
                    Timer::after_millis(100).await;
                    reset_to_usb_boot(0, 0);
                }
                Err(e) => {
                    let _ = write!(output, "-> ERROR: {}", e);
                }
            }

            match socket.write_all(output.as_bytes()).await {
                Ok(()) => {
                    info!("Answered '{}'", output.as_str());
                }
                Err(e) => {
                    warn!("write error: {:?}", e);
                    break;
                }
            };
            if close {
                info!("Closing connection");
                break;
            }
        }
        Timer::after_millis(10).await;
    }
}
src/motor.rs
use {
    embassy_rp::gpio::Output,
    embassy_time::{
        Duration,
        Timer,
    },
};

/// A simple motor driver that can be used to control
/// a motor using two GPIO pins.
pub struct Motor<'d> {
    pub p1: Output<'d>,
    pub p2: Output<'d>,
}
impl<'d> Motor<'d> {
    pub fn new(p1: Output<'d>, p2: Output<'d>) -> Self {
        Self { p1, p2 }
    }

    // If you have reversed the polarity of the motor, you can swap
    // the forward and backward methods to make it work without
    // changing the wiring.
    pub async fn forward(&mut self) {
        self.p1.set_low();
        self.p2.set_high();
    }

    pub async fn backward(&mut self) {
        self.p1.set_high();
        self.p2.set_low();
    }

    pub async fn stop(&mut self) {
        self.p1.set_low();
        self.p2.set_low();
    }

    pub async fn go_millis(&mut self, ms: i32) {
        if ms > 0 {
            self.forward().await;
            Timer::after(Duration::from_millis(ms as u64)).await;
        } else if ms < 0 {
            self.backward().await;
            Timer::after(Duration::from_millis((-ms) as u64)).await;
        }
        self.stop().await;
    }
}
src/servo.rs
use {
    crate::expect,
    embassy_rp::pwm::{
        Config,
        PwmOutput,
        SetDutyCycle,
    },
    log::{
        info,
    },
    fixed::types::U12F4,
};

/// Represents the steering direction.
#[derive(Debug, Clone, Copy, PartialEq, Eq)]
pub enum SteeringDirection {
    Center,
    Left,
    Right,
}

/// Allow controlling a servo using the Motor2 pins with PWM.
pub struct LegoServo<'d> {
    pub channel_a: PwmOutput<'d>,
    pub channel_b: PwmOutput<'d>,
}
impl<'d> LegoServo<'d> {
    /// Build a configuration for the PWM slice 7 that allows to control the servo.
    ///
    /// The frequency of the servo is 1200 Hz while the clock of the Pico (sys_clk) is at 125 MHz.
    /// The formula is
    ///     frequency = sys_clk / (divider * top)
    ///  -> 125_000_000 / (4 * 26041) = 1200 Hz/
    ///     and divider * top must fit in 16 bits
    /// (I didn't come with this divider of 4, it seems to be the usual practice)
    pub fn pwm_config() -> Config {
        let mut pwm_config = Config::default();
        pwm_config.divider = U12F4::from_num(4);
        pwm_config.top = 26041;
        pwm_config
    }

    /// Brings the servo back to its center position (0% duty cycle on both channels).
    pub fn center(&mut self) {
        let _ = self.channel_a.set_duty_cycle_fully_off();
        let _ = self.channel_b.set_duty_cycle_fully_off();
        info!("Set steering to CENTER with duty cycle 0% on both channels");
    }

    /// Sets the servo position.
    ///
    /// * `dir`: The direction to turn (`Left` or `Right`).
    /// * `level`: The intensity of the turn from `0` (center) to `7` (maximum lock).
    pub async fn set_position(&mut self, dir: SteeringDirection, level: u8) {
        // Clamp the input level to the maximum supported Lego steps
        let level = level.min(7);

        if level == 0 {
            self.center();
            return;
        }

        // Levels which seem to correspond to the Lego steering steps
        let duty_num = match level {
            1 => 266,  // 26.6%
            2 => 389,  // 38.9%
            3 => 512,  // 51.2%
            4 => 630,  // 63.0%
            5 => 750,  // 75.0%
            6 => 872,  // 87.2%
            _ => 1000, // 100.0%
        };

        // Apply PWM to one channel while forcing the other to ground (0)
        // Note: If Left/Right logic is inverted relative to your chassis build,
        // simply swap the channel_a and channel_b assignments below.
        match dir {
            SteeringDirection::Center => self.center(),
            SteeringDirection::Left => {
                expect(self.channel_a.set_duty_cycle_fully_off())
                    .await;
                expect(self.channel_b.set_duty_cycle_fraction(duty_num, 1000))
                    .await;
            }
            SteeringDirection::Right => {
                expect(self.channel_b.set_duty_cycle_fully_off())
                    .await;
                expect(self.channel_a.set_duty_cycle_fraction(duty_num, 1000))
                    .await;
            }
        }
    }
}
src/slice_writer.rs
use core::fmt::Write;

/// Wraps a mutable byte slice and implements the `Write` trait for it,
/// allowing formatted strings to be written into the slice.
pub struct SliceWriter<'a> {
    buf: &'a mut [u8],
    cursor: usize,
}

impl SliceWriter<'_> {
    pub fn new(buf: &mut [u8]) -> SliceWriter<'_> {
        SliceWriter { buf, cursor: 0 }
    }
    pub fn reset(&mut self) {
        self.cursor = 0;
    }
    pub fn as_bytes(&self) -> &[u8] {
        &self.buf[..self.cursor]
    }
}

impl<'a> Write for SliceWriter<'a> {
    fn write_str(&mut self, s: &str) -> core::fmt::Result {
        let bytes = s.as_bytes();
        if self.cursor + bytes.len() > self.buf.len() {
            return Err(core::fmt::Error);
        }
        self.buf[self.cursor..self.cursor + bytes.len()]
            .copy_from_slice(bytes);
        self.cursor += bytes.len();
        Ok(())
    }
}
src/utils.rs
use {
    embassy_time::Timer,
    panic_halt as _,
};

pub async fn expect<T, E: core::fmt::Debug>(res: Result<T, E>) -> T {
    match res {
        Ok(v) => v,
        Err(e) => {
            log::error!("Fatal error: {:?}", e);
            Timer::after_millis(100).await;
            panic!("Fatal error: {:?}", e);
        }
    }
}
Make it run
This build works like the previous one, with 2 added commands that you can send with netcat:
- run the motor n milliseconds, eg
g 150org -2000 - turn or center the servo, with a level in
[1-7], egl 2,c,r 5
When you checked everything works, it's time to go to the final step!
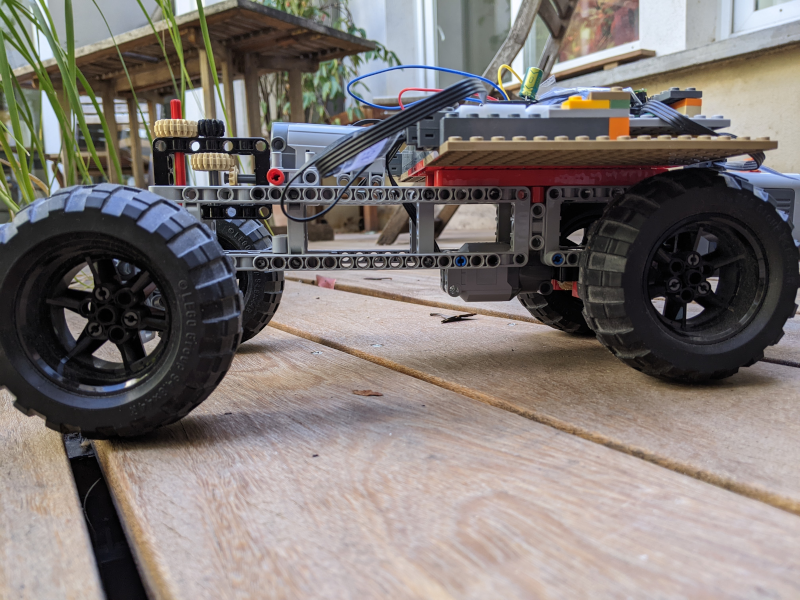
Step 5: The PicoMobile!
Let's build the real thing, the wireless car that you can drive with the 4 arrow keys of your computer's keyboard as in any video game.
Hardware design
If you're a Lego Technic fan, this is very easy to describe: build or take a Lego car, add the casing we made with the microcontrollers and electronics, wire the power, servo, and motor flat cables, and that's all.
Of course it's faster to say than to make, but it's Lego play.
Pay attention to the direction: there must be a strong reduction ratio between the servo's axis and the wheels, which must also stay parallel, so you need to build a proper direction, not just put a pair of wheels on the servo.
It's also better to include a differential in your build for a better behavior when turning. Luckily this gear is standard in the Lego world.
I show you my pico-mobile, but there's no reason for yours to look like mine.
Software design
Sending "go forward for 2000 ms" commands isn't how you want to drive your car.
You want to use the 4 arrow keys of your computer's keyboard, and you want the car to go forward when you press the ↑ key and keep going until you release the key, same for turning, and of course you want to turn and go forward (or backward) at the same time.
So we need a different command design.
We also need to take into account that Wifi isn't really reliable, so we don't want the car to go on when we couldn't send a stop message.
The idea is to send repeated order while a key is down, every 50ms (why 50 ? Because it looked good), to send a "stop" or "center" message when the key is released, and, car-side, to stop if there's no message for 200ms.
To deal with message reception, driving, and timeouts, and to support frequent messages, we change the embedded program's logic to use channels and multiple tasks. As we don't want obsolete messages to pile up, we opt for a bounded channel (only 2 driving tasks) with tasks being discarded when the channel is full.
To send those key related events from the computer, we need more than netcat, we need an UI.
I chose to make it a web application because it's a practical solution when you want an easy to extend application that you can make available on all computers of the same local wifi network, and because it's easy to handle repeatition and release of multiple keys in JavaScript.
I'm doing Rust, and I'm used to Axum, so I went with that stack. There's no logic anyway on the backend: it only sends to the car the orders received from the javascript GUI, so it's easier to evolve.
The embedded program
src/command.rs
use {
    crate::*,
    core::str::FromStr,
};

#[derive(Debug, Clone, Copy, PartialEq, Eq)]
pub enum Command {
    /// Servo or Motor driving command
    Driving(DrivingCommand),
    /// Toggle the LED
    ToggleLed,
    /// Disconnect the client, but keep the server running
    Bye,
    /// Disconnect the client and shut down the Pico (back to the bootloader)
    Quit,
}

impl From<DrivingCommand> for Command {
    fn from(driving_command: DrivingCommand) -> Self {
        Command::Driving(driving_command)
    }
}

const DEFAULT_STEERING_LEVEL: u8 = 2;

impl FromStr for Command {
    type Err = &'static str;

    fn from_str(s: &str) -> Result<Self, Self::Err> {
        let mut parts = s.split_whitespace();
        let command = parts.next().ok_or("empty command")?;
        match command {
            "led" | "toggle-led" => {
                Ok(Command::ToggleLed)
            }
            "go" | "forward" | "go-forward" => {
                Ok(DrivingCommand::GoForward.into())
            }
            "back" | "backward" | "go-backward" => {
                Ok(DrivingCommand::GoBackward.into())
            }
            "l" | "left" => {
                let level = match parts.next() {
                    Some(level_str) => {
                        let level = level_str
                            .parse::<u8>()
                            .map_err(|_| "level not parsable as u8")?;
                        if level > 7 {
                            return Err("level must be between 1 and 7");
                        }
                        level
                    }
                    None => DEFAULT_STEERING_LEVEL,
                };
                Ok(DrivingCommand::Steer {
                    direction: SteeringDirection::Left,
                    level,
                }.into())
            }
            "r" |"right" => {
                let level = match parts.next() {
                    Some(level_str) => {
                        let level = level_str
                            .parse::<u8>()
                            .map_err(|_| "level not parsable as u8")?;
                        if level > 7 {
                            return Err("level must be between 1 and 7");
                        }
                        level
                    }
                    None => DEFAULT_STEERING_LEVEL,
                };
                Ok(DrivingCommand::Steer {
                    direction: SteeringDirection::Right,
                    level,
                }.into())
            }
            "c" | "center" => Ok(DrivingCommand::Steer {
                direction: SteeringDirection::Center,
                level: 0,
            }.into()),
            "bye" => Ok(Command::Bye),
            "stop" => Ok(DrivingCommand::Stop.into()),
            "q" | "quit" => Ok(Command::Quit),
            _ => Err("unknown command"),
        }
    }
}
src/driving.rs
use {
    crate::*,
};

#[derive(Debug, Clone, Copy, PartialEq, Eq)]
pub enum DrivingCommand {
    /// Go forward
    GoForward,
    /// Go backward
    GoBackward,
    /// Stop moving
    Stop,
    /// Turn left, right, or center the steering
    /// with a certain level of intensity (0-7)
    Steer {
        direction: SteeringDirection,
        level: u8, // in [1-7]
    },
}

pub async fn apply_driving_command(
    command: DrivingCommand,
    motor: &mut Motor<'_>,
    servo: &mut LegoServo<'static>,
) {
    info!("Applying driving command: {:?}", command);
    match command {
        DrivingCommand::GoForward => {
            motor.forward().await;
        }
        DrivingCommand::GoBackward => {
            motor.backward().await;
        }
        DrivingCommand::Stop => {
            motor.stop().await;
        }
        DrivingCommand::Steer { direction, level } => {
            servo.set_position(direction, level).await;
        }
    }
}
src/main.rs
#![no_std]
#![no_main]

mod command;
mod driving;
mod motor;
mod servo;
mod slice_writer;
mod utils;

pub use {
    command::*,
    driving::*,
    motor::*,
    servo::*,
    slice_writer::*,
    utils::*,
};

use {
    core::{
        fmt::Write as _,
        str::from_utf8,
    },
    cyw43::{
        aligned_bytes,
        JoinOptions,
    },
    cyw43_pio::{
        PioSpi,
        DEFAULT_CLOCK_DIVIDER,
    },
    embassy_executor::Spawner,
    embassy_net::{
        tcp::TcpSocket,
        Config,
        StackResources,
    },
    embassy_rp::{
        bind_interrupts,
        clocks::RoscRng,
        dma,
        gpio::{
            Level,
            Output,
        },
        peripherals::{
            DMA_CH0,
            DMA_CH1,
            PIO0,
            USB,
        },
        pio::{
            InterruptHandler,
            Pio,
        },
        pwm::Pwm,
        usb::{
            Driver as UsbDriver,
            InterruptHandler as UsbIrqHandler,
        },
    },
    embassy_sync::{
        blocking_mutex::raw::CriticalSectionRawMutex,
        channel::Channel,
    },
    embassy_time::{
        with_timeout,
        Duration,
        Timer,
    },
    embedded_io_async::Write,
    log::{
        info,
        warn,
    },
    panic_halt as _,
    rp2040_hal::rom_data::reset_to_usb_boot,
    static_cell::StaticCell,
};

bind_interrupts!(struct Irqs {
    PIO0_IRQ_0 => InterruptHandler<PIO0>;
    DMA_IRQ_0 => dma::InterruptHandler<DMA_CH0>, dma::InterruptHandler<DMA_CH1>;
    USBCTRL_IRQ => UsbIrqHandler<USB>;
});

static COMMAND_CHANNEL: Channel<CriticalSectionRawMutex, DrivingCommand, 2> = Channel::new();

const WIFI_NETWORK: &str = env!("WIFI_SSID");
const WIFI_PASSWORD: &str = env!("WIFI_PASSWORD");

/// Execute driving commands coming on a channel, with a timeout to stop the
/// motor if no command is received for a while.
#[embassy_executor::task]
async fn driving_task(mut motor: Motor<'static>, mut servo: LegoServo<'static>) {
    let timeout_duration = Duration::from_millis(200);
    loop {
        let cmd = with_timeout(timeout_duration, COMMAND_CHANNEL.receive()).await;
        match cmd {
            Ok(command) => {
                info!("DRIVING COMMAND: {:?}", command);
                apply_driving_command(command, &mut motor, &mut servo).await;
            }
            Err(_timeout) => {
                info!("TIMEOUT");
                // Timeout or other command, stop the motor
                motor.stop().await;
                // In order not to loop for nothing and consuming CPU,
                // we block waiting for the next command
                let command = COMMAND_CHANNEL.receive().await;
                info!("FIRST DRIVING COMMAND: {:?}", command);
                apply_driving_command(command, &mut motor, &mut servo).await;
            }
        }
    }
}

#[embassy_executor::task]
async fn cyw43_task(
    runner: cyw43::Runner<
        'static,
        cyw43::SpiBus<Output<'static>, PioSpi<'static, PIO0, 0>>,
        cyw43::Cyw43439,
    >,
) -> ! {
    runner.run().await
}

#[embassy_executor::task]
async fn net_task(mut runner: embassy_net::Runner<'static, cyw43::NetDriver<'static>>) -> ! {
    runner.run().await
}

#[embassy_executor::task]
async fn logger_task(driver: UsbDriver<'static, USB>) {
    embassy_usb_logger::run!(1024, log::LevelFilter::Info, driver);
}

#[embassy_executor::task]
async fn tick() {
    let mut i = 0;
    loop {
        Timer::after_millis(10_000).await;
        i += 1;
        log::info!("tick {i}");
    }
}

#[embassy_executor::main]
async fn main(spawner: Spawner) {
    let p = embassy_rp::init(Default::default());

    // Logger USB — must be before everything else
    let usb_driver = UsbDriver::new(p.USB, Irqs);
    spawner.spawn(expect(logger_task(usb_driver)).await);

    info!("Starting...");

    // LED on pin 27 of the Kitronik 5331, active=high
    let mut led = Output::new(p.PIN_27, Level::Low);

    // Motor on pins Motor1 of the Kitronik 5331, which are mapped
    // to pins 2 and 3 of the RP2040
    let motor = Motor::new(
        Output::new(p.PIN_2, Level::Low),
        Output::new(p.PIN_3, Level::Low),
    );

    // Servo on pins Motor2 of the Kitronik 5331,
    // which are mapped to pins 6 and 7 of the RP2040,
    // pins which are handled by the PWM slice 3
    let pwm = Pwm::new_output_ab(p.PWM_SLICE3, p.PIN_6, p.PIN_7, LegoServo::pwm_config());
    let (channel_a, channel_b) = pwm.split();
    let servo = LegoServo {
        channel_a: channel_a.unwrap(), // safe ? probably...
        channel_b: channel_b.unwrap(),
    };

    spawner.spawn(expect(driving_task(motor, servo)).await);
    spawner.spawn(expect(tick()).await);

    let mut rng = RoscRng;

    let fw = aligned_bytes!("../../cyw43-firmware/43439A0.bin");
    let clm = aligned_bytes!("../../cyw43-firmware/43439A0_clm.bin");
    let nvram = aligned_bytes!("../../cyw43-firmware/nvram_rp2040.bin");

    let pwr = Output::new(p.PIN_23, Level::Low);
    let cs = Output::new(p.PIN_25, Level::High);
    let mut pio = Pio::new(p.PIO0, Irqs);
    let spi = PioSpi::new(
        &mut pio.common,
        pio.sm0,
        DEFAULT_CLOCK_DIVIDER,
        pio.irq0,
        cs,
        p.PIN_24,
        p.PIN_29,
        dma::Channel::new(p.DMA_CH0, Irqs),
        dma::Channel::new(p.DMA_CH1, Irqs),
    );

    static STATE: StaticCell<cyw43::State> = StaticCell::new();
    let state = STATE.init(cyw43::State::new());
    let (net_device, mut control, runner) = cyw43::new(state, pwr, spi, fw, nvram).await;
    spawner.spawn(expect(cyw43_task(runner)).await);

    control.init(clm).await;
    control
        .set_power_management(cyw43::PowerManagementMode::PowerSave)
        .await;

    let config = Config::dhcpv4(Default::default());

    // Generate random seed
    let seed = rng.next_u64();

    // Init network stack
    static RESOURCES: StaticCell<StackResources<3>> = StaticCell::new();
    let (stack, runner) = embassy_net::new(
        net_device,
        config,
        RESOURCES.init(StackResources::new()),
        seed,
    );

    spawner.spawn(expect(net_task(runner)).await);

    while let Err(err) = control
        .join(WIFI_NETWORK, JoinOptions::new(WIFI_PASSWORD.as_bytes()))
        .await
    {
        info!("join failed: {:?}", err);
    }

    info!("waiting for link...");
    stack.wait_link_up().await;

    info!("waiting for DHCP...");
    stack.wait_config_up().await;

    // And now we can use it!
    info!("Stack is up!");

    let mut rx_buffer = [0; 4096];
    let mut tx_buffer = [0; 4096];
    let mut buf = [0; 4096];

    loop {
        let mut socket = TcpSocket::new(stack, &mut rx_buffer, &mut tx_buffer);
        socket.set_timeout(Some(Duration::from_secs(10)));

        control.gpio_set(0, false).await;
        info!("Listening on TCP:1234...");
        led.set_high();
        Timer::after_millis(100).await;
        led.set_low();
        if let Err(e) = socket.accept(1234).await {
            warn!("accept error: {:?}", e);
            continue;
        }

        info!("Received connection from {:?}", socket.remote_endpoint());
        control.gpio_set(0, true).await;

        loop {
            let _ = socket.write_all(b"\n> ").await;
            let n = match socket.read(&mut buf).await {
                Ok(0) => {
                    warn!("read EOF");
                    break;
                }
                Ok(n) => n,
                Err(e) => {
                    warn!("read error: {:?}", e);
                    break;
                }
            };
            let Ok(input) = from_utf8(&buf[..n]) else {
                warn!("Received non-UTF8 data");
                continue;
            };

            info!(" <- Received '{}'", input);
            let cmd = input.parse::<Command>();

            let mut output = SliceWriter::new(&mut buf);
            let mut close = false;
            match cmd {
                Ok(Command::ToggleLed) => {
                    if led.is_set_high() {
                        led.set_low();
                        let _ = write!(output, "-> LED is now OFF");
                    } else {
                        led.set_high();
                        let _ = write!(output, "-> LED is now ON");
                    }
                }
                Ok(Command::Driving(driving_command)) => {
                    COMMAND_CHANNEL.send(driving_command).await;
                }
                Ok(Command::Bye) => {
                    let _ = write!(output, "-> Goodbye!");
                    close = true;
                }
                Ok(Command::Quit) => {
                    let _ = write!(output, "-> Shutting down...");
                    // we blink the LED a few times to give the user a visual feedback that the
                    // command was received, and so that the log can reach tio before the reset
                    // happens
                    for _ in 0..5 {
                        led.set_high();
                        Timer::after_millis(100).await;
                        led.set_low();
                        Timer::after_millis(100).await;
                    }
                    reset_to_usb_boot(0, 0);
                }
                Err(e) => {
                    let _ = write!(output, "-> ERROR: {}", e);
                }
            }

            match socket.write_all(output.as_bytes()).await {
                Ok(()) => {
                    info!("Answered '{}'", output.as_str());
                }
                Err(e) => {
                    warn!("write error: {:?}", e);
                    break;
                }
            };
            if close {
                info!("Closing connection");
                break;
            }
        }
        Timer::after_millis(10).await;
    }
}
src/motor.rs
use {
    embassy_rp::gpio::Output,
    embassy_time::{
        Duration,
        Timer,
    },
};

/// A simple motor driver that can be used to control a motor using two GPIO pins.
pub struct Motor<'d> {
    pub p1: Output<'d>,
    pub p2: Output<'d>,
}
impl<'d> Motor<'d> {
    pub fn new(p1: Output<'d>, p2: Output<'d>) -> Self {
        Self { p1, p2 }
    }

    // If you have reversed the polarity of the motor,
    // you can swap the forward and backward methods
    // to make it work without changing the wiring.
    pub async fn forward(&mut self) {
        self.p1.set_low();
        self.p2.set_high();
    }

    pub async fn backward(&mut self) {
        self.p1.set_high();
        self.p2.set_low();
    }

    pub async fn stop(&mut self) {
        self.p1.set_low();
        self.p2.set_low();
    }

    pub async fn go_millis(&mut self, ms: i32) {
        if ms > 0 {
            self.forward().await;
            Timer::after(Duration::from_millis(ms as u64)).await;
        } else if ms < 0 {
            self.backward().await;
            Timer::after(Duration::from_millis((-ms) as u64)).await;
        }
        self.stop().await;
    }
}
src/servo.rs
use {
    crate::expect,
    embassy_rp::pwm::{
        Config,
        PwmOutput,
        SetDutyCycle,
    },
    fixed::types::U12F4,
    log::info,
};

/// Represents the steering direction.
#[derive(Debug, Clone, Copy, PartialEq, Eq)]
pub enum SteeringDirection {
    Center,
    Left,
    Right,
}

/// Allow controlling a servo using the Motor2 pins with PWM.
pub struct LegoServo<'d> {
    pub channel_a: PwmOutput<'d>,
    pub channel_b: PwmOutput<'d>,
}
impl<'d> LegoServo<'d> {
    /// Build a configuration for the PWM slice 7 that allows to control the servo.
    ///
    /// The frequency of the servo is 1200 Hz while the clock of the Pico (sys_clk) is at 125 MHz.
    /// The formula is
    ///     frequency = sys_clk / (divider * top)
    ///  -> 125_000_000 / (4 * 26041) = 1200 Hz/
    ///     and divider * top must fit in 16 bits
    /// (I didn't come with this divider of 4, it seems to be the usual practice)
    pub fn pwm_config() -> Config {
        let mut pwm_config = Config::default();
        pwm_config.divider = U12F4::from_num(4);
        pwm_config.top = 26041;
        pwm_config
    }

    /// Brings the servo back to its center position (0% duty cycle on both channels).
    pub fn center(&mut self) {
        let _ = self.channel_a.set_duty_cycle_fully_off();
        let _ = self.channel_b.set_duty_cycle_fully_off();
        info!("Set steering to CENTER with duty cycle 0% on both channels");
    }

    /// Sets the servo position.
    ///
    /// * `dir`: The direction to turn (`Left` or `Right`).
    /// * `level`: The intensity of the turn from `0` (center) to `7` (maximum lock).
    pub async fn set_position(&mut self, dir: SteeringDirection, level: u8) {
        // Clamp the input level to the maximum supported Lego steps
        let level = level.min(7);

        if level == 0 {
            self.center();
            return;
        }

        // Levels which seem to correspond to the Lego steering steps
        let duty_num = match level {
            1 => 266,  // 26.6%
            2 => 389,  // 38.9%
            3 => 512,  // 51.2%
            4 => 630,  // 63.0%
            5 => 750,  // 75.0%
            6 => 872,  // 87.2%
            _ => 1000, // 100.0%
        };

        // Apply PWM to one channel while forcing the other to ground (0)
        // Note: If Left/Right logic is inverted relative to your chassis build,
        // simply swap the channel_a and channel_b assignments below.
        match dir {
            SteeringDirection::Center => self.center(),
            SteeringDirection::Left => {
                expect(self.channel_a.set_duty_cycle_fully_off())
                    .await;
                expect(self.channel_b.set_duty_cycle_fraction(duty_num, 1000))
                    .await;
            }
            SteeringDirection::Right => {
                expect(self.channel_b.set_duty_cycle_fully_off()).await;
                expect(self.channel_a.set_duty_cycle_fraction(duty_num, 1000)).await;
            }
        }
    }
}
src/slice_writer.rs
use core::fmt::Write;

/// Wraps a mutable byte slice and implements the `Write` trait for it,
/// allowing formatted strings to be written into the slice.
pub struct SliceWriter<'a> {
    buf: &'a mut [u8],
    cursor: usize,
}

impl SliceWriter<'_> {
    pub fn new(buf: &mut [u8]) -> SliceWriter<'_> {
        SliceWriter { buf, cursor: 0 }
    }
    pub fn reset(&mut self) {
        self.cursor = 0;
    }
    pub fn as_bytes(&self) -> &[u8] {
        &self.buf[..self.cursor]
    }
}

impl<'a> Write for SliceWriter<'a> {
    fn write_str(&mut self, s: &str) -> core::fmt::Result {
        let bytes = s.as_bytes();
        if self.cursor + bytes.len() > self.buf.len() {
            return Err(core::fmt::Error);
        }
        self.buf[self.cursor..self.cursor + bytes.len()]
            .copy_from_slice(bytes);
        self.cursor += bytes.len();
        Ok(())
    }
}
src/utils.rs
use {
    embassy_time::Timer,
    panic_halt as _,
};

pub async fn expect<T, E: core::fmt::Debug>(res: Result<T, E>) -> T {
    match res {
        Ok(v) => v,
        Err(e) => {
            log::error!("Fatal error: {:?}", e);
            Timer::after_millis(100).await;
            panic!("Fatal error: {:?}", e);
        }
    }
}
The control GUI
This application
- serves the web GUI, that is the files in
/static - maintains a TCP connection with the car
- on REST queries from the GUI, tunnels the orders to the car
Cargo.toml
[package]
name = "picomobile-control"
version = "0.1.0"
edition = "2024"

[dependencies]
axum = "0.8"
tokio = { version = "1", features = ["full"] }
tower-http = { version = "0.6", features = ["fs"] }
serde = { version = "1", features = ["derive"] }
clap = { version = "4", features = ["derive"] }
src/main.rs
use std::{net::SocketAddr, sync::Arc, time::Duration};

use axum::{
    extract::State,
    http::StatusCode,
    response::IntoResponse,
    routing::post,
    Json, Router,
};
use clap::Parser;
use serde::Deserialize;
use tokio::{
    io::AsyncWriteExt,
    net::TcpStream,
    sync::mpsc,
    time::sleep,
};
use tower_http::services::ServeDir;

#[derive(Parser)]
struct Args {
    /// Car IP address
    #[arg(long)]
    car_ip: String,

    /// Car TCP port
    #[arg(long)]
    car_port: u16,

    /// Web GUI port
    #[arg(long)]
    gui_port: u16,
}

#[derive(Clone)]
struct AppState {
    command_tx: mpsc::Sender<String>,
}

#[derive(Deserialize)]
struct CommandRequest {
    command: String,
}

#[tokio::main]
async fn main() {
    let args = Args::parse();

    let car_addr = Arc::new(format!("{}:{}", args.car_ip, args.car_port));
    let (command_tx, command_rx) = mpsc::channel::<String>(8);

    tokio::spawn(writer_task(
        Arc::clone(&car_addr),
        command_rx,
    ));

    let state = AppState {
        command_tx,
    };

    let app = Router::new()
        .route("/api/command", post(send_command))
        .fallback_service(ServeDir::new("static"))
        .with_state(state);

    let addr = SocketAddr::from(([0, 0, 0, 0], args.gui_port));

    println!("GUI available on http://{}", addr);

    let listener = tokio::net::TcpListener::bind(addr)
        .await
        .expect("bind failed");

    axum::serve(listener, app)
        .await
        .expect("server failed");
}

async fn send_command(
    State(state): State<AppState>,
    Json(req): Json<CommandRequest>,
) -> impl IntoResponse {
    match state.command_tx.try_send(req.command) {
        Ok(_) => StatusCode::NO_CONTENT,

        Err(tokio::sync::mpsc::error::TrySendError::Full(_)) => {
            // Queue already contains newer commands waiting to be sent.
            // Drop this one.
            StatusCode::NO_CONTENT
        }

        Err(tokio::sync::mpsc::error::TrySendError::Closed(_)) => {
            StatusCode::SERVICE_UNAVAILABLE
        }
    }
}

async fn writer_task(
    car_addr: Arc<String>,
    mut rx: mpsc::Receiver<String>,
) {
    let mut stream: Option<TcpStream> = None;

    while let Some(command) = rx.recv().await {
        let payload = format!("{command}\n");

        loop {
            if stream.is_none() {
                match TcpStream::connect(car_addr.as_str()).await {
                    Ok(s) => {
                        println!("Connected to car");
                        stream = Some(s);
                    }
                    Err(e) => {
                        eprintln!("Failed to connect to car: {e}");
                        break;
                    }
                }
            }

            let write_result = match stream.as_mut() {
                Some(s) => s.write_all(payload.as_bytes()).await,
                None => unreachable!(),
            };

            match write_result {
                Ok(_) => {
                    break;
                }
                Err(e) => {
                    eprintln!(
                        "Connection lost while sending '{}': {}",
                        command,
                        e
                    );

                    stream = None;

                    sleep(Duration::from_millis(500)).await;
                }
            }
        }
    }

    println!("Writer task exiting");
}
static/app.js
const pressed = {
    forward: false,
    backward: false,
    left: false,
    right: false,
};

async function sendCommand(command) {
    try {
        const response = await fetch('/api/command', {
            method: 'POST',
            headers: {
                'Content-Type': 'application/json',
            },
            body: JSON.stringify({ command }),
        });

        if (!response.ok) {
            console.error(`Command failed: ${command}`);
        }
    } catch (error) {
        console.error(`Error sending "${command}":`, error);
    }
}

function press(action) {
    if (pressed[action]) {
        return;
    }

    pressed[action] = true;

    // Immediate transmission for low latency.
    sendCommand(action);
}

function release(action) {
    if (!pressed[action]) {
        return;
    }

    pressed[action] = false;

    if (
        (action === 'forward' || action === 'backward') &&
        !pressed.forward &&
        !pressed.backward
    ) {
        sendCommand('stop');
    }

    if (
        (action === 'left' || action === 'right') &&
        !pressed.left &&
        !pressed.right
    ) {
        sendCommand('center');
    }
}

async function repeatLoop() {
    while (true) {
        if (pressed.forward) {
            sendCommand('forward');
        } else if (pressed.backward) {
            sendCommand('backward');
        }
        if (pressed.left) {
            sendCommand('left');
        } else if (pressed.right) {
            sendCommand('right');
        }
        await new Promise(resolve => setTimeout(resolve, 50));
    }
}

function initializeButtons() {
    document.querySelectorAll('[data-action]').forEach(button => {
        const action = button.dataset.action;

        button.addEventListener('mousedown', () => press(action));
        button.addEventListener('mouseup', () => release(action));

        button.addEventListener('mouseleave', () => {
            if (pressed[action]) {
                release(action);
            }
        });

        // Touch support for phones/tablets.
        button.addEventListener('touchstart', event => {
            event.preventDefault();
            press(action);
        });

        button.addEventListener('touchend', event => {
            event.preventDefault();
            release(action);
        });

        button.addEventListener('touchcancel', event => {
            event.preventDefault();
            release(action);
        });
    });
}

function initializeKeyboard() {
    const keyMap = {
        ArrowUp: 'forward',
        ArrowDown: 'backward',
        ArrowLeft: 'left',
        ArrowRight: 'right',
    };

    document.addEventListener('keydown', event => {
        const action = keyMap[event.key];

        if (!action) {
            return;
        }

        event.preventDefault();

        if (!event.repeat) {
            press(action);
        }
    });

    document.addEventListener('keyup', event => {
        const action = keyMap[event.key];

        if (!action) {
            return;
        }

        event.preventDefault();
        release(action);
    });

    // Prevent "stuck" keys if focus is lost.
    window.addEventListener('blur', () => {
        for (const action of Object.keys(pressed)) {
            release(action);
        }
    });
}

document.addEventListener('DOMContentLoaded', () => {
    initializeButtons();
    initializeKeyboard();
    repeatLoop();
});
static/index.html
<!DOCTYPE html>
<html lang="en">
<head>
    <meta charset="utf-8">
    <title>La PicoMobile</title>
    <link rel="stylesheet" href="style.css">
</head>
<body>

<h1>La PicoMobile</h1>

<div class="controller">
    <button data-action="forward">Forward ↑</button>

    <div class="steering">
        <button data-action="left">← Left</button>
        <button data-action="right">Right →</button>
    </div>

    <button data-action="backward">Backward ↓</button>
    <button data-action="toggle-led">Toggle LED</button>
</div>

<script src="app.js"></script>

</body>
</html>
static/style.css
body {
    font-family: sans-serif;
    text-align: center;
    margin-top: 2rem;
}

.controller {
    display: flex;
    flex-direction: column;
    gap: 1rem;
    align-items: center;
}

.steering {
    display: flex;
    gap: 0.5rem;
}

button {
    min-width: 120px;
    min-height: 60px;
    font-size: 1.1rem;
    cursor: pointer;
}
Make it run
Install the embedded program as you previously did (netcat is still handy to send the q command which reboots the Pico into the USB mode suitable for install).
The led flashes when the car is ready.
Go to the picomobile-control directory and start it (adapt the IP):
cargo run -- --car-ip '192.168.1.24' --car-port 1234 --gui-port 8083
On launch, it gives you the URL to connect your browser to, which brings you to this (pretty) page:
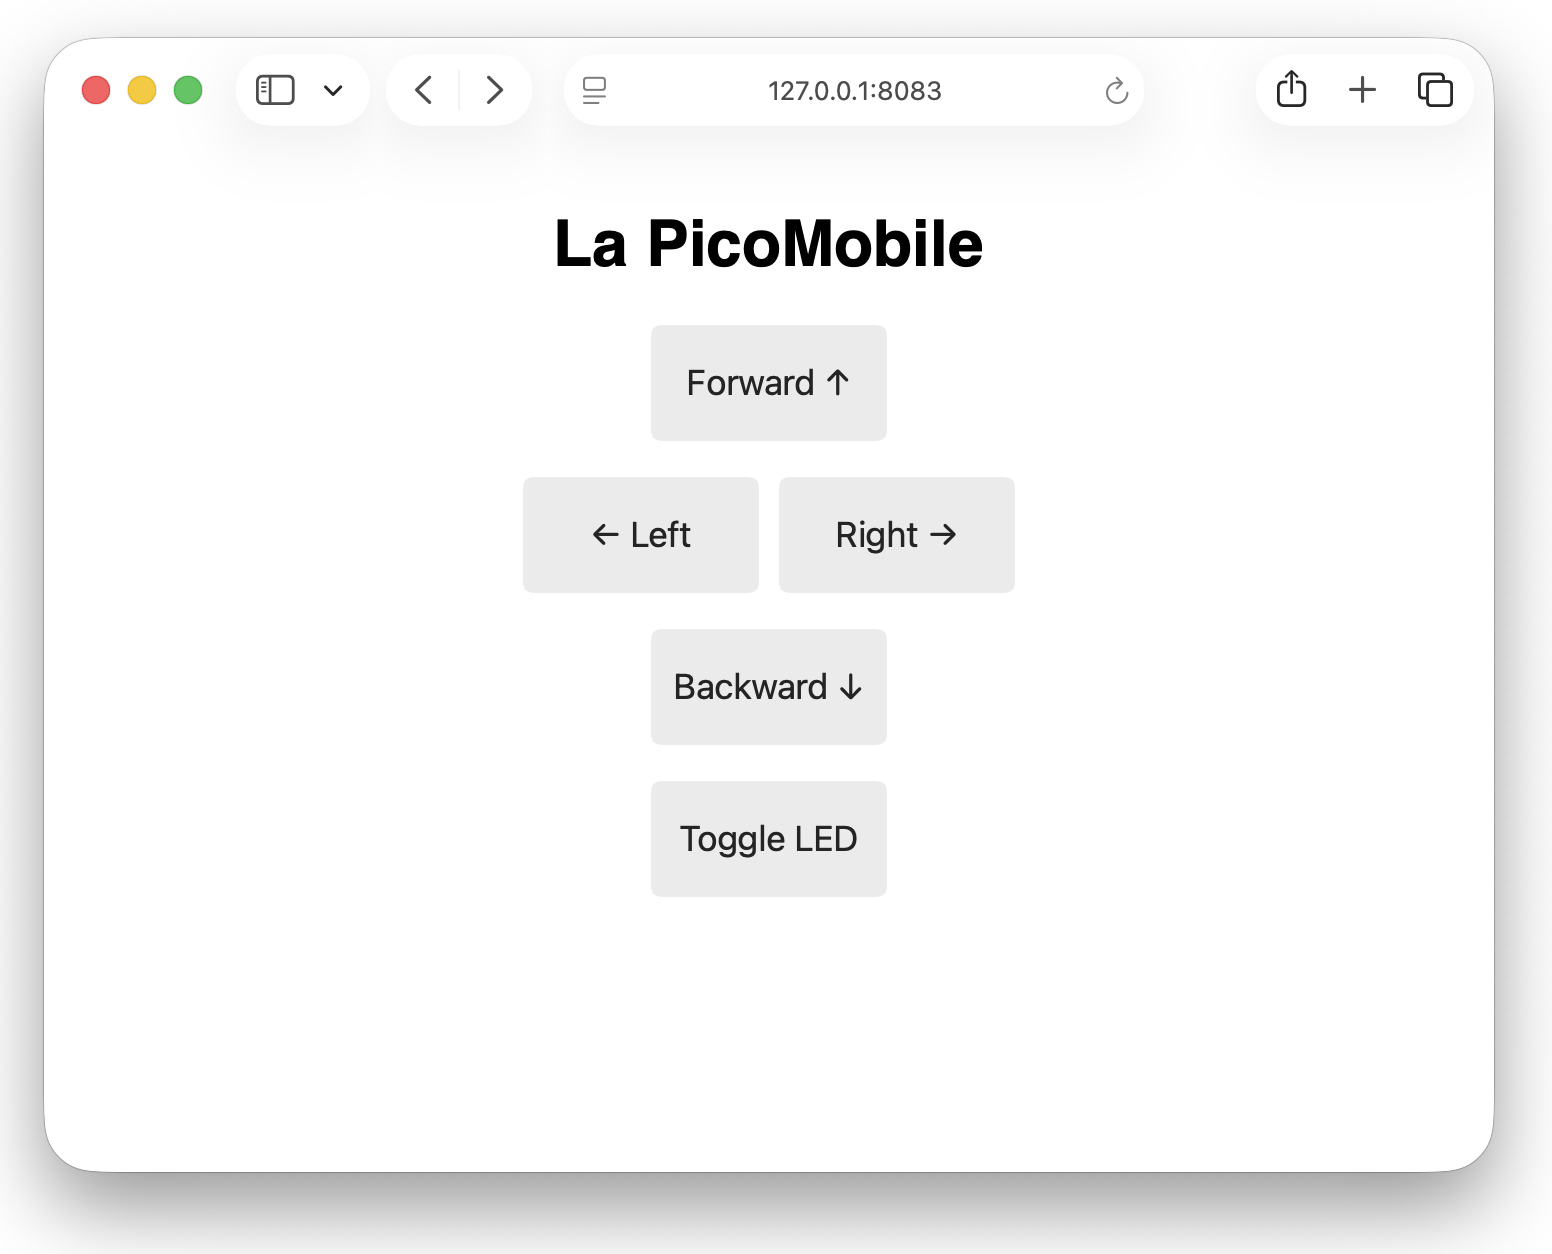
The 4 direction buttons are mostly hints: you're supposed to use the arrow keys for smoother control.
Conclusion
This isn't a production-grade RC vehicle. TCP isn't ideal for real-time control, the WiFi connection remains dependent on the local network, and the electronics are assembled on a breadboard.
But it is really working and is surprisingly capable.
Not only did we leverage our Lego components, sparing ourselves the cost of a servo or powerbank, we also did it in modern async Rust, and didn't suffer much from the lack of std.
Oh, and by the way, this is Rust. To make this, I had to open a lot of tabs in my browser, I had to wonder a few times why the parts were failing to light or rotate, but I never crashed the embedded program. This experience was 100% free of panics. Which was unexpected but welcome.
Now, I'd really like your feedback (eg on miaou or BlueSky).
My experience in embedded programming is still very young. The ecosystem too. I'm sure many improvements could be made to this car, or article. So please comment.
And if you make a working car, my kids would be delighted to see a picture of it!
Oh, and now there's a follow up: the FPV Picomobile !